What is Java?
Java is a high-level, general-purpose programming language that is designed to be platform-independent, meaning it can run on any operating system or platform that has a Java Virtual Machine (JVM). It was developed by Sun Microsystems (now owned by Oracle Corporation) and released in 1995.
Java is known for its simplicity, readability, and write-once-run-anywhere approach. It follows the principle of "write once, run anywhere," which means that Java code can be written once and run on any device or platform that has a compatible JVM.
Java is widely used for developing a variety of applications, including desktop applications, web applications, mobile apps, enterprise systems, and embedded systems. It is also the primary language for developing Android applications.
Some key features of Java include:
- Object-oriented programming: Java is an object-oriented language, which means it follows the principles of encapsulation, inheritance, and polymorphism.
- Platform independence: Java programs are compiled into bytecode, which can be executed on any platform with a Java Virtual Machine (JVM). This makes Java highly portable and platform-independent.
- Robust and secure: Java includes features for automatic memory management (garbage collection) and built-in security mechanisms to prevent common programming errors and protect against malicious code.
- Large standard library: Java provides a vast standard library with built-in classes and APIs for various tasks, such as networking, file handling, database access, and more.
- Multithreading: Java supports concurrent programming through its built-in support for multithreading, allowing programs to execute multiple threads of execution simultaneously.
Overall, Java is a versatile and widely adopted programming language that offers a strong foundation for building reliable, scalable, and cross-platform applications.
History of Java
The history of Java begins in the early 1990s when a team of developers at Sun Microsystems (now owned by Oracle Corporation) started working on a project known as "Green." The team, led by James Gosling, aimed to create a programming language for consumer electronic devices, such as set-top boxes and handheld devices.
Initially, the project was focused on developing a language called "Oak," but due to trademark conflicts, the name was changed to "Java." The team envisioned Java as a language that would enable developers to write code once and run it on any device, regardless of the underlying hardware and operating system.
In 1995, Sun Microsystems officially released Java to the public. It gained significant attention and popularity due to its unique features and capabilities. One of the key reasons for Java's success was its platform independence, achieved through the use of the Java Virtual Machine (JVM). The JVM acted as an interpreter that could execute Java bytecode on any platform, making Java programs highly portable.
Java quickly gained traction in the enterprise software development world. Its robustness, security features, and object-oriented programming model made it suitable for building complex applications. Additionally, Java's ability to support multithreading and networking made it a preferred choice for developing server-side applications.
In 1996, Sun Microsystems released the first major update to Java, known as Java 1.0. The language continued to evolve with regular updates and releases, introducing new features, enhancements, and improvements over time. Some notable versions of Java include Java 2 (released in 1998), Java SE 5 (released in 2004, introducing generics and annotations), Java SE 8 (released in 2014, introducing lambdas and functional programming features), and Java SE 11 (released in 2018, marking a significant shift towards a more rapid release cadence).
Oracle Corporation acquired Sun Microsystems in 2010, taking over the stewardship of Java. Under Oracle's leadership, Java has continued to evolve and adapt to the changing needs of the software development community. It remains one of the most widely used programming languages in various domains, including enterprise systems, web development, mobile app development (especially for Android), and more.
The history of Java showcases its evolution from a language for consumer electronic devices to a versatile, robust, and widely adopted programming language used in a variety of applications and industries.
Features of Java
Simple:
Object-Oriented:
Platform Independent:
Portable:
Robust:
Secure:
Interpreted:
Multi-Threaded:
Java has a simple syntax and a clear programming model, making it easy to learn and use.
Example:
public static void main(String[] args) {
int a = 10;
int b = 20;
int sum = a + b;
System.out.println("Sum: " + sum);
}
}
Java is an object-oriented programming language, which means it uses objects and classes to structure code and implement concepts such as inheritance and polymorphism.
Example:
public static void main(String[] args) {
Rectangle rectangle = new Rectangle(5, 10);
int area = rectangle.calculateArea();
System.out.println("Area: " + area);
}
}
class Rectangle {
private int length;
private int width;
public Rectangle(int length, int width) {
this.length = length;
this.width = width;
}
public int calculateArea() {
return length * width;
}
}
Java programs can run on any platform or operating system that has a Java Virtual Machine (JVM), making them platform-independent.
Example:
public static void main(String[] args) {
System.out.println("Hello, Java!");
}
}
Java programs are compiled into bytecode, which can be executed on any system with a compatible JVM, making them portable across different platforms.
Java provides strong type checking, exception handling, and memory management through automatic garbage collection, making it robust and less prone to errors.
Java has built-in security features that protect against common security threats, such as viruses, unauthorized access, and tampering.
Java code is compiled into bytecode, which is then interpreted and executed by the JVM, providing a balance between performance and flexibility.
Java supports multithreading, allowing concurrent execution of multiple threads, enabling developers to create efficient and responsive applications.
Example:
{ public static void main(String[] args)
{ Thread thread1 = new Thread(()-> {
for (int i = 0; i < 5; i++) {
System.out.println("Thread 1: " + i);
}
});
Thread thread2 = new Thread(()-> {
for (int i = 0; i < 5; i++) {
System.out.println("Thread 2: " + i);
}
});
thread1.start();
thread2.start();
}
}
C++ vs Java
C++ and Java are both popular programming languages, but they have distinct differences in terms of their design, features, and areas of application. Here's a comparison between C++ and Java:
- C++: C++ is a multi-paradigm language that supports procedural, object-oriented, and generic programming. It has a more complex syntax compared to Java.
- Java: Java is an object-oriented programming language that follows a simplified syntax and enforces strict object-oriented principles.
- C++: In C++, programmers have control over memory management using features like manual memory allocation and deallocation with new and delete keywords. This flexibility allows for more efficient memory usage but also increases the risk of memory leaks and segmentation faults.
- Java: Java uses automatic memory management through a garbage collector. It handles memory allocation and deallocation automatically, freeing the programmer from explicit memory management. This reduces the risk of memory-related errors but may introduce some overhead.
- C++: C++ is known for its high performance and efficiency. It allows low-level control over hardware resources and provides features like direct memory access and inline assembly. C++ is commonly used for system programming, game development, and other performance-critical applications.
- Java: Java is generally considered to have slightly lower performance compared to C++. However, modern JVM implementations have made significant optimizations, and Java's just-in-time (JIT) compilation can often achieve performance comparable to C++. Java is widely used for building enterprise software, web applications, and Android apps
- C++: C++ code needs to be compiled separately for each target platform, making it less portable. Porting C++ code across different operating systems and architectures requires recompilation and adjustment of platform-specific code.
- Java: Java programs are compiled into platform-independent bytecode, which can run on any system with a compatible Java Virtual Machine (JVM). This makes Java highly portable, as the bytecode is interpreted or JIT-compiled at runtime.
- C++: C++ provides a rich set of libraries, including the Standard Template Library (STL), which offers containers, algorithms, and generic programming support. However, the C++ standard library is not as extensive as Java's standard library.
- Java: Java has a vast standard library known as the Java Class Library (JCL) or the Java Development Kit (JDK), which provides a wide range of pre-built classes and APIs for common tasks, such as I/O, networking, database connectivity, and GUI development.
- C++: C++ uses exceptions for error handling, allowing programmers to catch and handle exceptions thrown during runtime. Error handling in C++ is optional and depends on the developer's implementation.
- Java: Java has built-in support for exceptions and enforces structured exception handling. It requires developers to handle or declare checked exceptions explicitly, ensuring proper error handling throughout the code.
Syntax and Programming Paradigm:
Memory Management:
Performance:
Portability:
Standard Libraries and Ecosystem:
Error Handling:
Summary
Procedure to Write & Run Java Program
- Install Java Development Kit (JDK): Ensure that you have the JDK installed on your computer. The JDK includes the Java compiler (javac) and the Java Virtual Machine (JVM) needed to run Java programs.
- Choose a Text Editor or Integrated Development Environment (IDE): Select a text editor or an IDE to write your Java code. Some popular options include Eclipse, IntelliJ IDEA, and Visual Studio Code. These tools provide features like code highlighting, auto-completion, and debugging support.
- Create a New Java File: Open your chosen text editor or IDE and create a new file with a .java extension. The filename should match the class name you'll define in your program.
- Define the Class: Every Java program starts with a class definition. Declare a class with the same name as the file (without the .java extension). For example, if your file is named MyProgram.java, the class declaration should be public class MyProgram.
- Write the Main Method: Inside the class, define a method called main, which serves as the entry point for your Java program. The main method has the following signature: public static void main(String[] args). This is where the program execution starts.
- Add Program Logic: Within the main method, write the code that defines the behavior of your program. This can include variable declarations, control structures (if statements, loops), method calls, and more.
- Compile the Program: Open a command prompt or terminal, navigate to the directory where your Java file is saved, and use the javac command to compile the program. For example, if your file is named MyProgram.java, run javac MyProgram.java. This will generate a bytecode file with a .class extension.
- Run the Program: After successful compilation, run the Java program using the java command followed by the class name. For example, if your class is named MyProgram, run java MyProgram. The program will execute, and you'll see the output (if any) in the console.
Structure of a Java program
public static void main(String[] args) {
// Program logic goes here
}
}
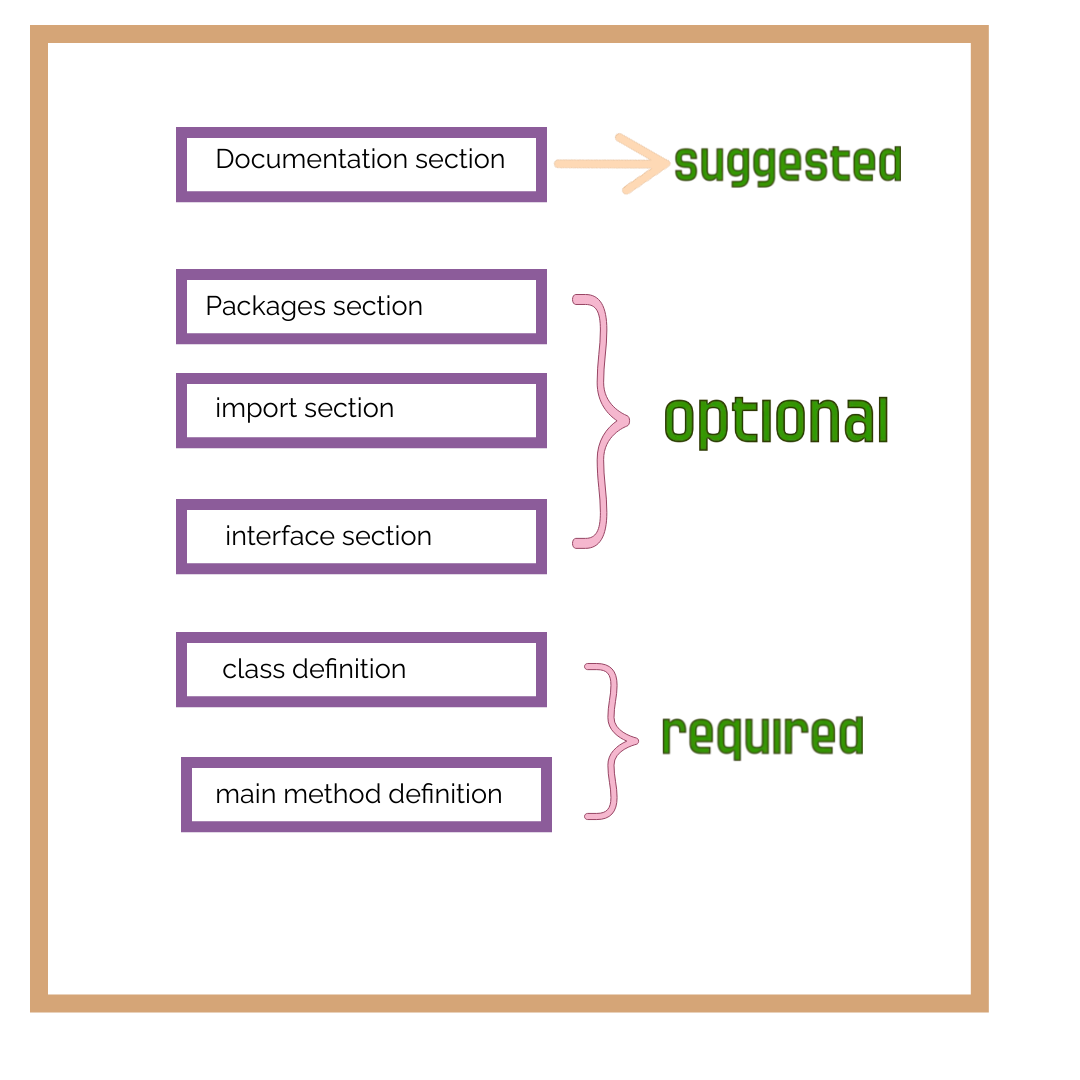
Java Program Structure
The internal structure of a Java program consists of various components that work together to define the behavior and execution flow of the program
Package Declaration:
Import Statements:
Class Definition:
Class Members:
Main Method:
Program Logic:
Additional Methods and Classes:
Comments:
Optionally, you can start your Java program with a package declaration statement. It specifies the package (directory structure) in which the program resides.
Example
Following the package declaration (or at the beginning of the program if there is no package declaration), you can include import statements to access classes from other packages without having to specify their fully qualified names.
Example
Every Java program consists of at least one class. A class is a blueprint or template for creating objects that encapsulate data and behavior. The class definition begins with the class keyword, followed by the class name.
Example
// Class members (fields and methods) go here
}
Inside the class, you can define various members such as fields (variables) and methods. These members describe the attributes and behavior of the class.
Example
private int number; // Field
public void printNumber() { // Method
System.out.println("Number: " + number);
}
}
The main method serves as the entry point for the Java program. It is the method that is executed when you run the program. The main method has a specific signature
Example
// Program logic goes here
}
Inside the main method, you write the code that defines the behavior of your program. This can include variable declarations, control structures (if statements, loops), method calls, and more.
Example
int x = 5;
int y = 10;
int sum = x + y;
System.out.println("Sum: " + sum);
}
Apart from the main method, you can define additional methods and classes within the program structure. Methods allow you to encapsulate reusable code, while classes enable you to create objects with specific properties and behavior.
You can include comments in your code to provide explanations and make it more readable. Java supports single-line comments (//) and multi-line comments (/* */).
Set path for Java
To set the path for Java, you need to configure the "PATH" environment variable on your system. The steps to set the Java path vary depending on the operating system you are using. Here are the instructions for the most commonly used operating systems:
- Open the Control Panel and navigate to System and Security > System.
- Click on "Advanced system settings" on the left side.
- In the System Properties window, click on the "Environment Variables" button.
- In the "System Variables" section, scroll down and locate the "Path" variable.
- Select the "Path" variable and click on the "Edit" button.
- In the Edit Environment Variable window, add the path to the Java installation directory. The default path for Java is usually something like "C:\Program Files\Java\jdk1.x.x_xx\bin" or "C:\Program Files\Java\jre1.x.x_xx\bin" (replace "x" with the appropriate version numbers).
- Click "OK" to save the changes.
- Open a terminal window.
- Run the following command to open the profile file in a text editor:
For macOS: nano ~/.bash_profile
For Linux: 'nano ~/.bashrc' or 'nano ~/.bash_profile' - Add the following line at the end of the file to set the Java path:
export PATH="/usr/lib/jvm/java-x.x.x/bin:$PATH"
Replace "x.x.x" with the appropriate version numbers. - Save the file by pressing Ctrl+O (or Command+O for macOS), and then press Enter.
- Exit the text editor by pressing Ctrl+X (or Command+X for macOS).
- In the terminal, run the following command to apply the changes:
For macOS: 'source ~/.bash_profile'
Windows:
macOS and Linux:
Note
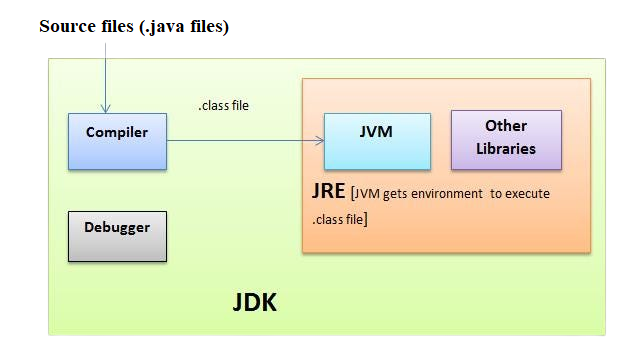
JDK, JRE and JVM
- The JDK is used by developers to write, compile, and package Java applications.
- It includes the Java compiler (javac) to convert Java source code (.java files) into bytecode (.class files).
- Developers can use various development tools provided by the JDK, such as debuggers, profilers, and documentation generators.
- The JDK also includes libraries and APIs that developers can use to build Java applications, such as the Java Standard Library and JavaFX.
- During development, the JDK allows developers to test and debug their code before deploying it.
- The JRE is used by end-users who want to run Java applications.
- It provides the necessary runtime environment for executing Java applications.
- The JRE includes the JVM, which interprets and executes the compiled Java bytecode.
- When a user launches a Java application, the JRE starts the JVM, loads the bytecode, and executes the program.
- The JRE also provides the Java class libraries and resources required by Java applications to run.
- The JVM is responsible for executing Java bytecode on the underlying hardware and operating system.
- It acts as an intermediary between the Java program and the system, providing platform independence.
- When a Java application is launched, the JVM loads the bytecode generated by the Java compiler.
- The JVM interprets the bytecode or uses Just-In-Time (JIT) compilation to convert it into machine code for better performance.
- The JVM manages memory allocation and garbage collection to ensure efficient memory usage.
- It also provides runtime security checks to enforce Java's security features, such as sandboxing and access control.
- The JVM allows Java programs to run on different platforms without requiring recompilation, thanks to its platform-independent nature.
JDK (Java Development Kit):
JRE (Java Runtime Environment):
JVM (Java Virtual Machine):
Summary
JVM: Java Virtual Machine
The Java Virtual Machine (JVM) is a crucial component of the Java platform. It is an abstract virtual machine that enables the execution of Java bytecode, which is the compiled form of Java source code. The JVM provides an environment for running Java applications by interpreting or just-in-time (JIT) compiling the bytecode into machine code that can be executed by the underlying operating system.
Platform Independence:
One of the fundamental features of the JVM is its platform independence. Java programs are compiled into bytecode, which is a platform-neutral representation of the source code. The JVM abstracts the underlying hardware and operating system, allowing the same bytecode to run on any system that has a compatible JVM implementation.Class Loading:
The JVM loads Java classes dynamically as they are needed during runtime. It follows a class-loading mechanism that involves locating, loading, and linking the necessary class files from the classpath or other defined locations. The class-loading process ensures that classes are loaded and initialized when they are first accessed.Bytecode Execution:
The JVM interprets the bytecode instructions and executes them sequentially. The interpreter reads each bytecode instruction, performs the corresponding operation, and moves to the next instruction. This interpretation process allows Java programs to be executed on any system with a JVM.Just-In-Time (JIT) Compilation:
In addition to interpretation, modern JVM implementations use JIT compilation techniques to improve performance. The JVM dynamically analyzes the executed bytecode and identifies sections of the code that are frequently executed, known as hotspots. It then compiles these hotspots into highly optimized machine code for direct execution by the CPU. JIT compilation helps to achieve better performance by eliminating the overhead of interpreting bytecode.Memory Management:
The JVM manages memory allocation and deallocation through automatic memory management techniques like garbage collection. It tracks the allocation and usage of objects and automatically reclaims memory occupied by objects that are no longer reachable. This relieves developers from manual memory management, making Java programs more robust and less prone to memory-related errors.Security and Sandboxing:
The JVM enforces various security measures to ensure the safe execution of Java programs. It provides a security manager that enforces access control and permission restrictions. Java programs run within a sandboxed environment, which restricts their access to system resources and prevents malicious activitiesRuntime Environment:
The JVM provides a runtime environment that includes essential runtime libraries, such as the Java Standard Library, which contains a vast collection of pre-built classes and APIs. These libraries provide functionalities for tasks like I/O operations, networking, database access, GUI development, and more.
Here are some key points about the JVM:
Summary
Java Variables
In Java, variables are used to store data and provide a way to refer to that data by a name. They are an essential part of programming as they allow us to manipulate and work with values in our code. Here's a detailed and easy-to-understand explanation of variables in Java:
Variable Declaration:
Before using a variable, we need to declare it. Variable declaration involves specifying the variable's data type and giving it a nameVariable Initialization:
After declaring a variable, we can assign an initial value to it. Initialization involves providing an initial value to the variable.Variable Types:
Java has several built-in data types for variables, including:- Primitive Types: int, double, boolean, char, etc. These types hold simple values directly.
- Reference Types: String, arrays, objects, etc. These types refer to complex objects or collections of data.
Naming Conventions:
When naming variables, we need to follow certain naming conventions:- Variable names should start with a letter (or underscore) and can be followed by letters, digits, or underscores.
- Variable names are case-sensitive, so "age" and "Age" are considered different variables.
- Choose meaningful and descriptive names to make the code more readable and maintainable.
Variable Scope:
The scope of a variable refers to the part of the program where the variable is visible and accessible. Java has several levels of scope, including:- Local Variables: Declared inside a block of code and are only accessible within that block.
- Instance Variables: Belong to an instance of a class and are accessible throughout the entire class.
- Class Variables: Shared by all instances of a class and are declared using the static keyword.
Variable Assignment and Manipulation:
Once a variable is declared and initialized, we can assign new values to it or perform operations on it.Variable Constants:
In Java, we can declare constants using the 'final' keyword. Constants are variables whose values cannot be changed once assigned.Variable Usage:
Variables are used to store and retrieve values during program execution. They allow us to perform calculations, make decisions, and store data for later use.
For example:
For example:
For example:
int y = 5;
int sum = x + y; // Assign the sum of x and y to the variable "sum"
For example:
Data Types
In Java, data types define the type and size of values that can be stored in variables. Java has two main categories of data types: primitive data types and reference data types.
-
Primitive Data Types:
boolean:
Represents a boolean value, either 'true' or 'false'.byte:
Represents a signed 8-bit integer value, ranging from -128 to 127.short:
Represents a signed 16-bit integer value, ranging from -32,768 to 32,767.int:
Represents a signed 32-bit integer value, ranging from -2,147,483,648 to 2,147,483,647.long:
Represents a signed 64-bit integer value, ranging from -9,223,372,036,854,775,808 to 9,223,372,036,854,775,807.float:
Represents a 32-bit floating-point value, used for decimal values with lower precisiodouble:
Represents a 64-bit floating-point value, used for decimal values with higher precision.char:
Represents a single Unicode character, such as 'a', 'A', or '$'.
-
Reference Data Types:
String:
Represents a sequence of characters and is used to store text.Arrays:
Represents a collection of elements of the same type, stored in contiguous memory locations.Classes:
Represents objects that are instances of a class, providing a blueprint for creating objects with specific properties and behaviors.Interfaces:
Defines a contract that classes can implement, specifying a set of methods that the implementing class must define.
Java also provides the concept of wrapper classes for primitive data types, such as 'Integer', 'Double', 'Boolean', etc. These wrapper classes allow you to treat primitive types as objects and provide utility methods for converting, comparing, and performing operations on the values.
Data types in Java have specific sizes, which determine the amount of memory allocated for storing values of that type. This ensures efficient memory usage and allows the compiler to perform type checking during compilation.
Additionally, Java supports type casting, which allows you to convert values from one data type to another. Implicit type casting, also known as widening, occurs automatically when assigning a value of a smaller data type to a larger data type. Explicit type casting, or narrowing, requires manual casting and may result in data loss or truncation.
Unicode System
The Unicode system is a standard for representing characters from different writing systems and languages using a universal character encoding scheme. It provides a unique code point for each character, regardless of the platform, program, or language.
Unicode aims to encompass all characters used in human writing systems, including alphabets, ideographs, symbols, and special characters. It supports a wide range of scripts, including Latin, Cyrillic, Arabic, Chinese, Japanese, Korean, and many more.
The Unicode character set is organized into planes, each containing 65,536 code points. The first plane, called the Basic Multilingual Plane (BMP), covers commonly used characters and symbols. Additional planes, such as Supplementary Multilingual Plane (SMP) and Supplementary Ideographic Plane (SIP), provide space for less common characters, historical scripts, and special symbols.
In Java, the `char` data type represents a single Unicode character. It uses a 16-bit value to store the Unicode code point of the character. This allows Java programs to work with characters from various writing systems and ensures compatibility across different platforms and locales.
Java provides built-in support for working with Unicode characters and strings. The `String` class in Java represents a sequence of Unicode characters and provides methods for manipulating and processing strings.
Unicode support in Java enables developers to handle multilingual text, internationalization, and localization effectively. It allows applications to handle diverse languages and character sets, making Java a suitable choice for developing global software solutions.
operators in java
-
Arithmetic Operators:
-
Addition (+):
For Example:
int a = 5 + 3; // a will be 8 -
Subtraction (-):
For Example:
int b = 10 - 4; // b will be 6 -
Multiplication (*):
For Example:
int c = 2 * 3; // c will be 6 -
Division (/):
For Example:
int d = 10 / 2; // d will be 5 -
Modulus (%):
For Example:
int e = 10 % 3; // e will be 1
-
-
Assignment Operators:
-
Assignment (=):
For Example:
int x = 5; // x is assigned the value 5 -
Addition assignment (+=):
For Example:
int y = 10; y += 5; // y will be 15 (equivalent to y = y + 5)
-
-
Comparison Operators:
-
Equal to (==):
For Example:
int a = 5; boolean result = (a == 5); // result will be true -
Not equal to (!=):
For Example:
int b = 7; boolean result = (b != 5); // result will be true -
Greater than (>):
For Example:
int c = 8; boolean result = (c > 5); // result will be true -
Less than (<):
For Example:
int d = 3;
boolean result = (d < 5); // result will be true
-
-
Logical Operators:
-
Logical AND (&&):
For Example:
boolean a = true;
boolean b = false;
boolean result = (a && b); // result will be false
-
Logical OR (||):
For Example:
boolean c = true;
boolean d = false;
boolean result = (c || d); // result will be true
-
Logical NOT (!):
For Example:
boolean a = true;
boolean result = !a; // result will be false
-
-
Increment and Decrement Operators:
-
Increment (++):
For Example:
int a = 5;
a++; // a will be 6
-
Decrement (--):
For Example:
int b = 8;
b--; // b will be 7
-
-
bitwise operators
-
Bitwise AND (&):
For Example:
int a = 5; // binary: 0101
int b = 3; // binary: 0011
int result = a & b; // binary: 0001 (decimal: 1)
-
Bitwise OR (|):
For Example:
int a = 5; // binary: 0101
int b = 3; // binary: 0011
int result = a | b; // binary: 0111 (decimal: 7)
-
Bitwise XOR (^):
For Example:
int a = 5; // binary: 0101
int b = 3; // binary: 0011
int result = a ^ b; // binary: 0110 (decimal: 6)
-
Bitwise NOT (~):
For Example:
int a = 5; // binary: 0101
int result = ~a; // binary: 1010 (decimal: -6)
-
Left Shift (<<):
For Example:
int a = 5; // binary: 0101
int result = a << 2; // binary: 010100 (decimal: 20)
-
Right Shift (>>):
For Example:
int a = 15; // binary: 1111
int result = a >> 2; // binary: 0011 (decimal: 3)
-
Unsigned Right Shift (>>>):
For Example:
int a = -15; // binary: 11111111111111111111111111110001
int result = a >>> 2; // binary: 00111111111111111111111111111100 (decimal: 1073741820)
-
Bitwise AND with Assignment (&=):
For Example:
int a = 5; // binary: 0101
int b = 3; // binary: 0011
a &= b; // a = a & b; // binary: 0001 (decimal: 1)
-
Bitwise OR with Assignment (|=):
For Example:
int a = 5; // binary: 0101
int b = 3; // binary: 0011
a |= b; // a = a | b; // binary: 0111 (decimal: 7)
-
Bitwise XOR with Assignment (^=):
For Example:
int a = 5; // binary: 0101
int b = 3; // binary: 0011
a ^= b; // a = a ^ b; // binary: 0110 (decimal: 6)
-
Left Shift with Assignment (<<=):
For Example:
int a = 5; // binary: 0101
a <<= 2; // binary: 010100 (decimal: 20)
-
Right Shift with Assignment (>>=):
For Example:
int a = 15; // binary: 1111
a >>= 2; // binary: 0011 (decimal: 3)
-
Unsigned Right Shift with Assignment (>>>=):
For Example:
int a = -15; // binary: 11111111111111111111111111110001
a >>>= 2; // binary: 00111111111111111111111111111100 (decimal: 1073741820)
-
Here's an example Java program that demonstrates the use of various operators:
Example Program
public static void main(String[] args) {
// Arithmetic Operators
int num1 = 10;
int num2 = 5;
int addition = num1 + num2;
int subtraction = num1 - num2;
int multiplication = num1 * num2;
int division = num1 / num2;
int modulus = num1 % num2;
System.out.println("Addition: " + addition);
System.out.println("Subtraction: " + subtraction);
System.out.println("Multiplication: " + multiplication);
System.out.println("Division: " + division);
System.out.println("Modulus: " + modulus);
// Assignment Operators
int num3 = 10;
num3 += 5; // equivalent to num3 = num3 + 5;
System.out.println("Updated num3: " + num3);
// Relational Operators
int num4 = 5;
int num5 = 7;
boolean isEqual = num4 == num5;
boolean isNotEqual = num4 != num5;
boolean isGreater = num4 > num5;
boolean isLesser = num4 < num5;
boolean isGreaterOrEqual = num4 >= num5;
boolean isLesserOrEqual = num4 <= num5;
System.out.println("Is equal: " + isEqual);
System.out.println("Is not equal: " + isNotEqual);
System.out.println("Is greater: " + isGreater);
System.out.println("Is lesser: " + isLesser);
System.out.println("Is greater or equal: " + isGreaterOrEqual);
System.out.println("Is lesser or equal: " + isLesserOrEqual);
// Logical Operators
boolean condition1 = true;
boolean condition2 = false;
boolean logicalAnd = condition1 && condition2;
boolean logicalOr = condition1 || condition2;
boolean logicalNot = !condition1;
System.out.println("Logical AND: " + logicalAnd);
System.out.println("Logical OR: " + logicalOr);
System.out.println("Logical NOT: " + logicalNot);
// Bitwise Operators
int num6 = 5; // binary: 0101
int num7 = 3; // binary: 0011
int bitwiseAnd = num6 & num7;
int bitwiseOr = num6 | num7;
int bitwiseXor = num6 ^ num7;
int bitwiseNot = ~num6;
int leftShift = num6 << 2;
int rightShift = num6 >> 2;
int unsignedRightShift = num6 >>> 2;
System.out.println("Bitwise AND: " + bitwiseAnd);
System.out.println("Bitwise OR: " + bitwiseOr);
System.out.println("Bitwise XOR: " + bitwiseXor);
System.out.println("Bitwise NOT: " + bitwiseNot);
System.out.println("Left Shift: " + leftShift);
System.out.println("Right Shift: " + rightShift);
System.out.println("Unsigned Right Shift: " + unsignedRightShift);
}
}
Java control statements
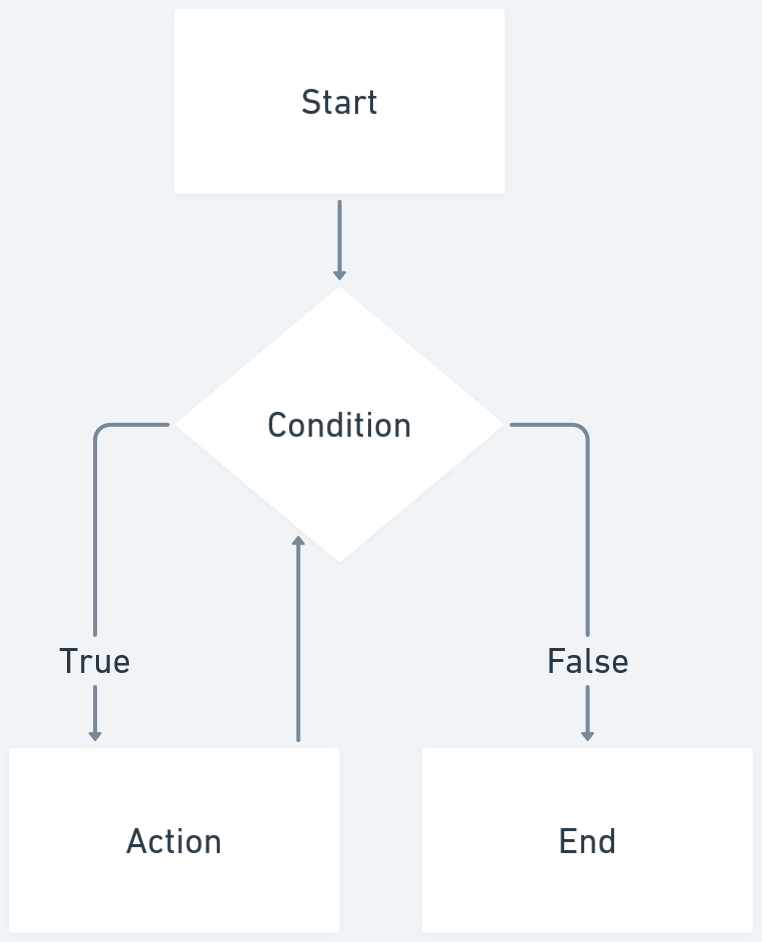
Java control statements are used to control the flow of execution in a Java program. They allow you to make decisions, perform repetitive tasks, and alter the program's flow based on certain conditions. Here are the main types of control statements in Java:
If Statement:
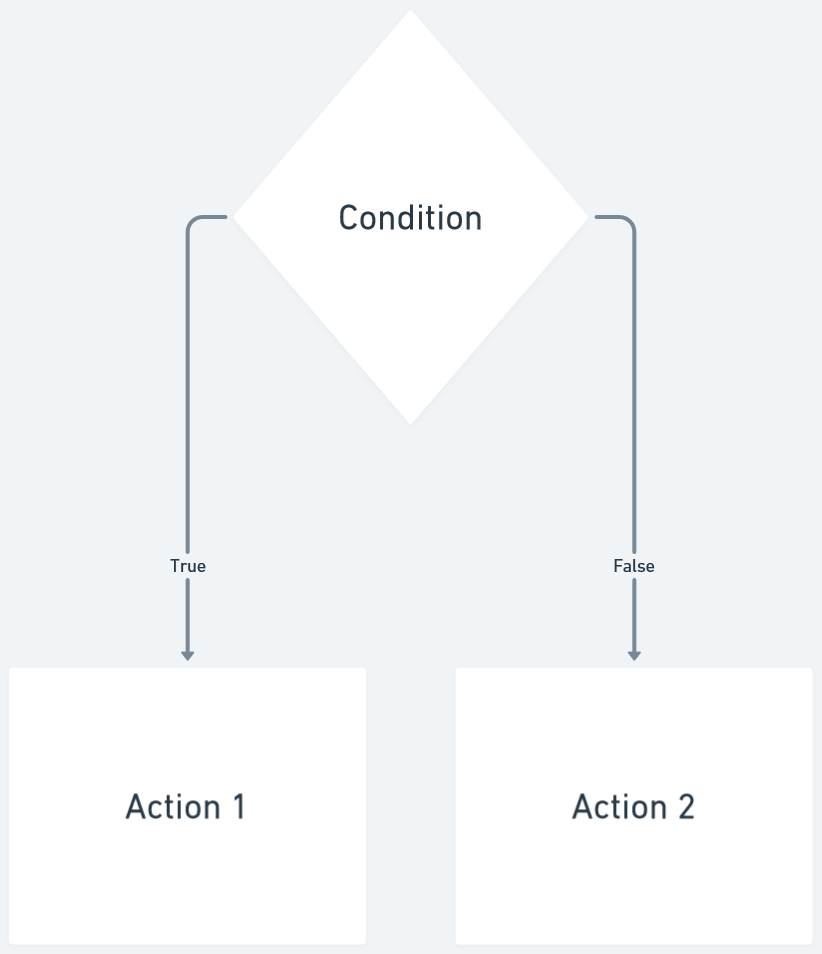
The if statement allows you to execute a block of code if a specified condition is trueIf-else Statement:
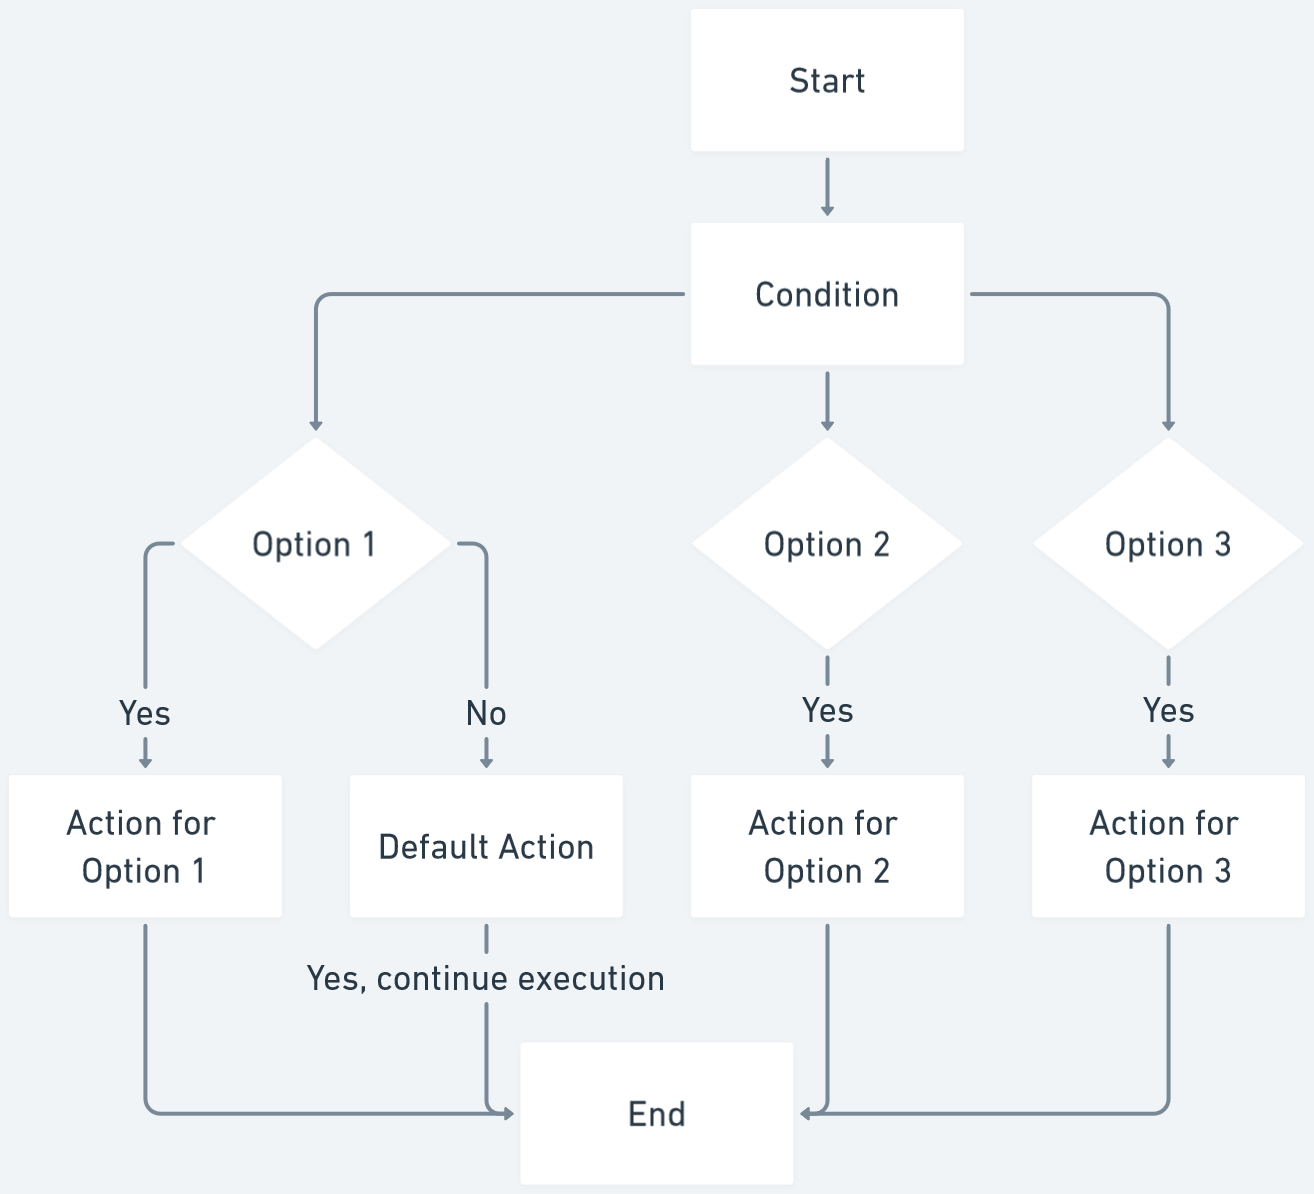
The if-else statement allows you to execute one block of code if a condition is true and another block of code if the condition is false.Switch Statement:
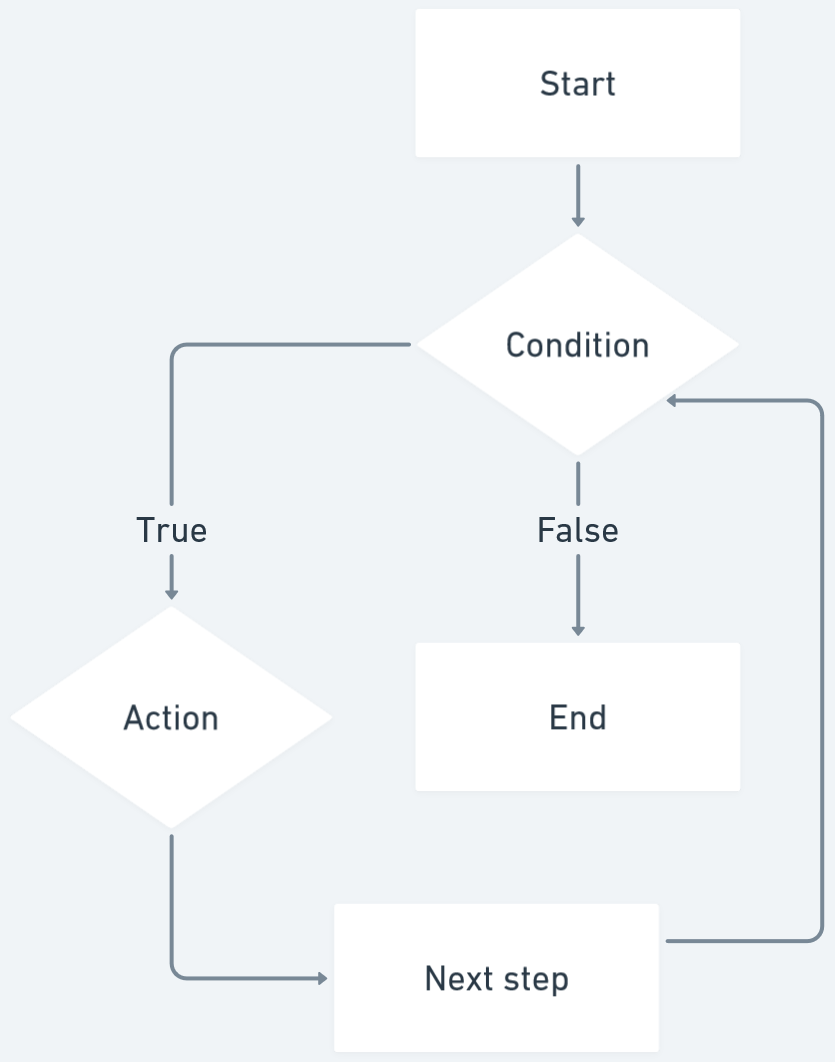
The switch statement allows you to select one of many code blocks to be executed based on the value of an expression.While Loop:
The while loop allows you to repeatedly execute a block of code as long as a specified condition is true.Do-While Loop:
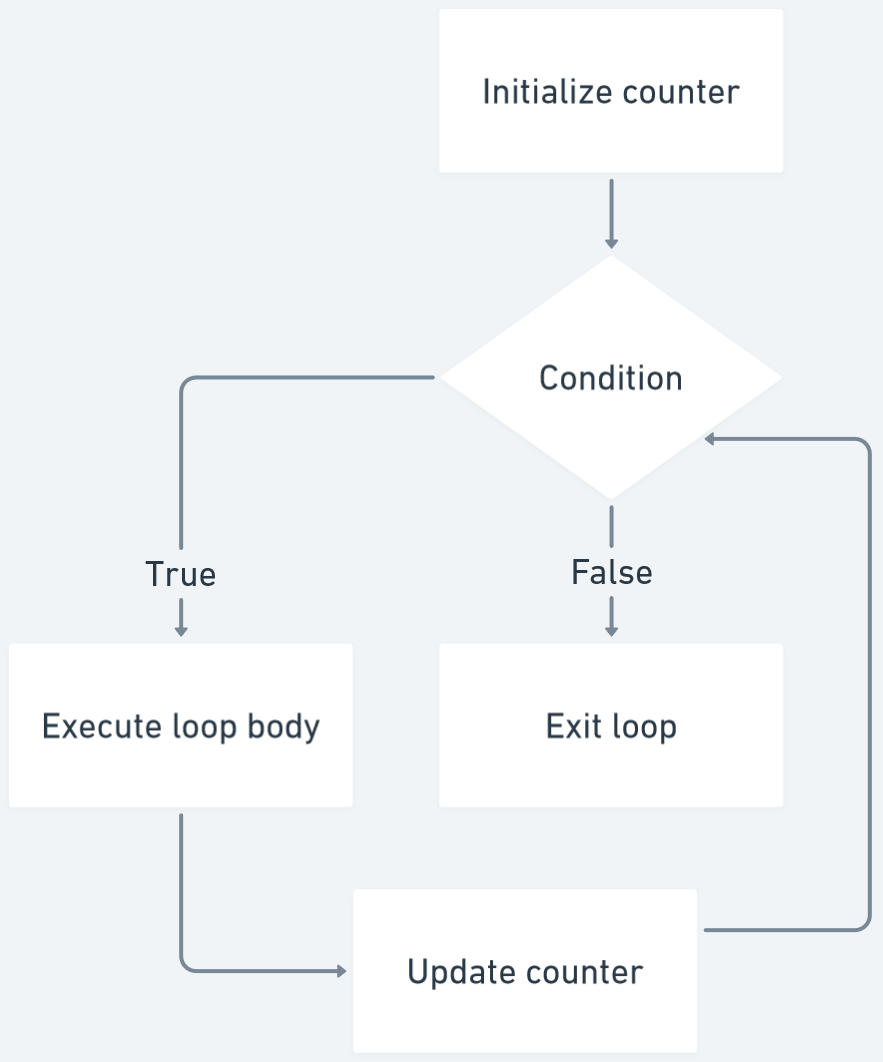
The do-while loop is similar to the while loop, but it executes the code block at least once before checking the condition.For Loop:
The for loop allows you to execute a block of code repeatedly with more control over the loop initialization, condition, and increment/decrement.
Syntax:
// Code to execute if condition is true
}
Syntax:
// Code to execute if condition is true
} else {
// Code to execute if condition is false
}
Syntax:
case value1:
// Code to execute if expression matches value1
break;
case value2:
// Code to execute if expression matches value2
break;
// ...
default:
// Code to execute if expression does not match any case
}
Syntax:
// Code to execute repeatedly while condition is true
}
Syntax:
// Code to execute repeatedly
} while (condition);
Syntax:
// Code to execute repeatedly
}
If-else Statement
Example Program:
public static void main(String[] args) {
Scanner scanner = new Scanner(System.in);
System.out.print("Enter the student's score: ");
int score = scanner.nextInt();
if (score >= 90) {
System.out.println("Grade: A");
} else if (score >= 80) {
System.out.println("Grade: B");
} else if (score >= 70) {
System.out.println("Grade: C");
} else if (score >= 60) {
System.out.println("Grade: D");
} else {
System.out.println("Grade: F");
}
scanner.close();
}
}
Switch Statement:
Example Program:
public class DayOfWeek {
public static void main(String[] args) {
Scanner scanner = new Scanner(System.in);
System.out.print("Enter a number between 1 and 7: ");
int dayNumber = scanner.nextInt();
String day;
switch (dayNumber) {
case 1:
day = "Sunday";
break;
case 2:
day = "Monday";
break;
case 3:
day = "Tuesday";
break;
case 4:
day = "Wednesday";
break;
case 5:
day = "Thursday";
break;
case 6:
day = "Friday";
break;
case 7:
day = "Saturday";
break;
default:
day = "Invalid day";
break;
}
System.out.println("The day is: " + day);
scanner.close();
}
}
For Loop:
Example Program:
public static void main(String[] args) {
int number = 5;
System.out.println("Multiplication Table for " + number);
for (int i = 1; i <= 10; i++) {
int result = number * i;
System.out.println(number + " * " + i + " = " + result);
}
}
}
While Loop:
Example Program:
public class GuessingGame {
public static void main(String[] args) {
Scanner scanner = new Scanner(System.in);
int randomNumber = (int) (Math.random() * 100) + 1;
boolean guessed = false;
System.out.println("Guess the number between 1 and 100");
while (!guessed) {
System.out.print("Enter your guess: ");
int guess = scanner.nextInt();
if (guess == randomNumber) {
System.out.println("Congratulations! You guessed the correct number.");
guessed = true;
} else if (guess < randomNumber) {
System.out.println("Too low! Try again.");
} else {
System.out.println("Too high! Try again.");
}
}
scanner.close();
}
}
Do-While Loop:
Example Program:
public class FactorialCalculator {
public static void main(String[] args) {
Scanner scanner = new Scanner(System.in);
System.out.print("Enter a number: ");
int number = scanner.nextInt();
int factorial = 1;
int i = 1;
do {
factorial *= i;
i++;
} while (i <= number);
System.out.println("Factorial of " + number + " is: " + factorial);
scanner.close();
}
}
break Statement
The 'break' statement in Java is used to terminate the execution of a loop or switch statement. It is typically used in conditional statements to exit the loop or switch statement prematurely. When the 'break' statement is encountered, the program flow jumps to the next statement after the loop or switch block.
Example Program:
public class BreakExample {
public static void main(String[] args) {
Scanner scanner = new Scanner(System.in);
int sum = 0;
while (true) {
System.out.print("Enter a number (or -1 to exit): ");
int number = scanner.nextInt();
if (number == -1) {
break; // exit the loop if -1 is entered
}
sum += number;
}
System.out.println("Sum of the numbers: " + sum);
scanner.close();
}
}
In this program, the user is prompted to enter numbers. The loop continues indefinitely '(while (true))' until the user enters '-1'. When '-1' is entered, the 'break' statement is executed, causing the program flow to exit the loop and proceed to the next statement after the loop. The sum of the entered numbers is then displayed.
The 'break' statement is useful when you want to prematurely terminate the execution of a loop based on a certain condition.
Continue Statement
The 'continue' statement in Java is used to skip the remaining code in the current iteration of a loop and move to the next iteration. It is typically used in loops to skip specific iterations based on certain conditions, allowing you to selectively process the loop iterations.
Example Program:
public static void main(String[] args) {
for (int i = 1; i <= 10; i++) {
if (i % 2 == 0) {
continue; // skip even numbers
}
System.out.println(i);
}
}
}
In this program, a 'for' loop is used to iterate from 1 to 10. The 'if' condition checks if the current number 'i' is even ('i % 2 == 0'). If it is, the 'continue' statement is executed, causing the remaining code in the current iteration to be skipped, and the loop proceeds to the next iteration. This effectively skips the printing of even numbers, and only the odd numbers are displayed.
The 'continue' statement allows you to control the flow of execution within a loop and selectively skip certain iterations based on specific conditions. It can be useful when you want to exclude certain elements or perform conditional processing within a loop.
Java Comments
n Java, comments are used to add explanatory notes and information within the source code. They are ignored by the compiler and do not affect the execution of the program. Comments are helpful for improving code readability, providing documentation, and temporarily disabling code segments.
There are three types of comments in Java:
Single-line comments:
These comments start with '//' and extend until the end of the line. They are used to add comments on a single line.Multi-line comments:
These comments start with /* and end with */. They can span multiple lines and are used for longer comments or to comment out entire blocks of code.Documentation comments:
These comments start with /** and end with */. They are used to create documentation for classes, methods, and variables using JavaDoc tool. These comments are processed by the JavaDoc tool to generate API documentation.
Example Program:
int age = 25; // Assigning a value to the variable
Example Program:
This is a multi-line comment.
It can span multiple lines.
*/
int number = 10;
/* Commented out code
int x = 5;
int y = 7;
*/
Example Program:
* This is a documentation comment for a class or method.
* It provides information about the purpose, usage, and parameters of the element.
*/
public class MyClass {
/**
* This is a documentation comment for a method.
* @param x the input parameter
* @return the result of the calculation
*/
public int calculate(int x) {
// ...
}
}
Comments are important for improving code understandability and maintainability. They help other developers (including yourself) to understand the code and its intentions. It is good practice to include comments to explain complex logic, assumptions, or any other relevant information that might aid in understanding the code.
Java Programs
Check if a Number is Prime:
Program:
public class PrimeNumberChecker {
public static void main(String[] args) {
Scanner scanner = new Scanner(System.in);
System.out.print("Enter a number: ");
int number = scanner.nextInt();
boolean isPrime = true;
if (number <= 1) {
isPrime = false;
}
else {
for (int i = 2; i <= Math.sqrt(number); i++) {
if (number % i == 0) {
isPrime = false;
break;
}
}
}
if (isPrime) {
System.out.println(number + " is a prime number.");
}
else {
System.out.println(number + " is not a prime number.");
}
}
}
Generate Fibonacci Series:
Program:
public class FibonacciSeries {
public static void main(String[] args) {
Scanner scanner = new Scanner(System.in);
System.out.print("Enter the number of terms: ");
int n = scanner.nextInt();
int firstTerm = 0, secondTerm = 1;
System.out.print("Fibonacci Series: " + firstTerm + ", " + secondTerm);
for (int i = 3; i <= n; i++) {
int nextTerm = firstTerm + secondTerm;
System.out.print(", " + nextTerm);
firstTerm = secondTerm;
secondTerm = nextTerm;
}
}
}
Reverse a String:
Program:
public class StringReversal {
public static void main(String[] args) {
Scanner scanner = new Scanner(System.in);
System.out.print("Enter a string: ");
String input = scanner.nextLine();
String reversed = "";
for (int i = input.length() - 1; i >= 0; i--) {
reversed += input.charAt(i);
}
System.out.println("Reversed string: " + reversed);
}
}
Check if a String is Palindrome:
Program:
public class PalindromeChecker {
public static void main(String[] args) {
Scanner scanner = new Scanner(System.in);
System.out.print("Enter a string: ");
String input = scanner.nextLine();
String reversed = "";
for (int i = input.length() - 1; i >= 0; i--) {
reversed += input.charAt(i);
}
if (input.equalsIgnoreCase(reversed)) {
System.out.println("The string is a palindrome.");
}
else {
System.out.println("The string is not a palindrome.");
}
}
}
Count Words in a Sentence:
Program:
public class WordCount {
public static void main(String[] args) {
Scanner scanner = new Scanner(System.in);
System.out.print("Enter a sentence: ");
String sentence = scanner.nextLine();
String[] words = sentence.split("\\s+");
System.out.println("Number of words: " + words.length);
}
}
Calculate Factorial of a Number:
Program:
public class FactorialCalculator {
public static void main(String[] args) {
Scanner scanner = new Scanner(System.in);
System.out.print("Enter a number: ");
int number = scanner.nextInt();
int factorial = 1;
for (int i = 2; i <= number; i++) {
factorial *= i;
}
System.out.println("Factorial of " + number + " is: " + factorial);
}
}
Generate Random Numbers:
Program:
public class RandomNumberGenerator {
public static void main(String[] args) {
Random random = new Random();
int randomNumber = random.nextInt(100); // Generates a random number between 0 and 99
System.out.println("Random number: " + randomNumber);
}
}
Find Roots of a Quadratic Equation:
Program:
public class QuadraticEquationSolver {
public static void main(String[] args) {
Scanner scanner = new Scanner(System.in);
System.out.println("Enter the coefficients of the quadratic equation (a, b, c):");
double a = scanner.nextDouble();
double b = scanner.nextDouble();
double c = scanner.nextDouble();
double discriminant = b * b - 4 * a * c;
if (discriminant > 0) {
double root1 = (-b + Math.sqrt(discriminant)) / (2 * a);
double root2 = (-b - Math.sqrt(discriminant)) / (2 * a);
System.out.println("Roots are real and different.");
System.out.println("Root 1: " + root1);
System.out.println("Root 2: " + root2);
}
else if (discriminant == 0) {
double root = -b / (2 * a);
System.out.println("Roots are real and same.");
System.out.println("Root: " + root);
}
else {
System.out.println("Roots are complex and imaginary.");
}
}
}
Sort an Array:
Program:
public class ArraySorting {
public static void main(String[] args) {
int[] numbers = {5, 2, 8, 1, 9, 3, 7, 4, 6}
;
System.out.println("Original array: " + Arrays.toString(numbers));
Arrays.sort(numbers);
System.out.println("Sorted array: " + Arrays.toString(numbers));
}
}
Calculate Area of Circle:
Program:
public class CircleAreaCalculator {
public static void main(String[] args) {
Scanner scanner = new Scanner(System.in);
System.out.print("Enter the radius of the circle: ");
double radius = scanner.nextDouble();
double area = Math.PI * radius * radius;
System.out.println("Area of the circle: " + area);
}
}
Calculate Area of Triangle:
Program:
public class TriangleAreaCalculator {
public static void main(String[] args) {
Scanner scanner = new Scanner(System.in);
System.out.print("Enter the base length of the triangle: ");
double base = scanner.nextDouble();
System.out.print("Enter the height of the triangle: ");
double height = scanner.nextDouble();
double area = 0.5 * base * height;
System.out.println("Area of the triangle: " + area);
}
}
Calculate Area of Rectangle:
Program:
public class RectangleAreaCalculator {
public static void main(String[] args) {
Scanner scanner = new Scanner(System.in);
System.out.print("Enter the length of the rectangle: ");
double length = scanner.nextDouble();
System.out.print("Enter the width of the rectangle: ");
double width = scanner.nextDouble();
double area = length * width;
System.out.println("Area of the rectangle: " + area);
}
}
Calculate Area of Square:
Program:
public class SquareAreaCalculator {
public static void main(String[] args) {
Scanner scanner = new Scanner(System.in);
System.out.print("Enter the side length of the square: ");
double sideLength = scanner.nextDouble();
double area = sideLength * sideLength;
System.out.println("Area of the square: " + area);
}
}
Calculate Area of Trapezoid:
Program:
public class TrapezoidAreaCalculator {
public static void main(String[] args) {
Scanner scanner = new Scanner(System.in);
System.out.print("Enter the length of the top base: ");
double topBase = scanner.nextDouble();
System.out.print("Enter the length of the bottom base: ");
double bottomBase = scanner.nextDouble();
System.out.print("Enter the height of the trapezoid: ");
double height = scanner.nextDouble();
double area = 0.5 * (topBase + bottomBase) * height;
System.out.println("Area of the trapezoid: " + area);
}
}
Check if a Number is Armstrong:
Program:
public class ArmstrongNumberChecker {
public static void main(String[] args) {
Scanner scanner = new Scanner(System.in);
System.out.print("Enter a number: ");
int number = scanner.nextInt();
int originalNumber = number;
int result = 0;
int digit;
while (originalNumber != 0) {
digit = originalNumber % 10;
result += Math.pow(digit, 3);
originalNumber /= 10;
}
if (result == number) {
System.out.println(number + " is an Armstrong number.");
}
else {
System.out.println(number + " is not an Armstrong number.");
}
}
}
Find GCD of Two Numbers:
Program:
public class GCDCalculator {
public static void main(String[] args) {
Scanner scanner = new Scanner(System.in);
System.out.print("Enter the first number: ");
int number1 = scanner.nextInt();
System.out.print("Enter the second number: ");
int number2 = scanner.nextInt();
int gcd = 1;
for (int i = 1; i <= number1 && i <= number2; i++) {
if (number1 % i == 0 && number2 % i == 0) {
gcd = i;
}
}
System.out.println("GCD of " + number1 + " and " + number2 + " is: " + gcd);
}
}
Find LCM of Two Numbers:
Program:
public class LCMCalculator {
public static void main(String[] args) {
Scanner scanner = new Scanner(System.in);
System.out.print("Enter the first number: ");
int number1 = scanner.nextInt();
System.out.print("Enter the second number: ");
int number2 = scanner.nextInt();
int lcm;
lcm = (number1 > number2) ? number1 : number2;
while (true) {
if (lcm % number1 == 0 && lcm % number2 == 0) {
break;
}
lcm++;
}
System.out.println("LCM of " + number1 + " and " + number2 + " is: " + lcm);
}
}
Convert Decimal to Binary:
Program:
public class DecimalToBinaryConverter {
public static void main(String[] args) {
Scanner scanner = new Scanner(System.in);
System.out.print("Enter a decimal number: ");
int decimal = scanner.nextInt();
String binary = "";
while (decimal > 0) {
binary = (decimal % 2) + binary;
decimal /= 2;
}
System.out.println("Binary representation: " + binary);
}
}
Convert Binary to Decimal:
Program:
public class BinaryToDecimalConverter {
public static void main(String[] args) {
Scanner scanner = new Scanner(System.in);
System.out.print("Enter a binary number: ");
String binary = scanner.nextLine();
int decimal = 0;
int power = 0;
for (int i = binary.length() - 1; i >= 0; i--) {
int digit = binary.charAt(i) - '0';
decimal += digit * Math.pow(2, power);
power++;
}
System.out.println("Decimal representation: " + decimal);
}
}
Implement Bubble Sort:
Program:
public static void main(String[] args) {
int[] array = {5, 3, 8, 4, 2}
;
bubbleSort(array);
System.out.println("Sorted array: " + Arrays.toString(array));
}
public static void bubbleSort(int[] array) {
int n = array.length;
for (int i = 0; i < n - 1; i++) {
for (int j = 0; j < n - i - 1; j++) {
if (array[j] > array[j + 1]) {
int temp = array[j];
array[j] = array[j + 1];
array[j + 1] = temp;
}
}
}
}
}
Implement Selection Sort:
Program:
public static void main(String[] args) {
int[] array = {5, 3, 8, 4, 2}
;
selectionSort(array);
System.out.println("Sorted array: " + Arrays.toString(array));
}
public static void selectionSort(int[] array) {
int n = array.length;
for (int i = 0; i < n - 1; i++) {
int minIndex = i;
for (int j = i + 1; j < n; j++) {
if (array[j] < array[minIndex]) {
minIndex = j;
}
}
int temp = array[minIndex];
array[minIndex] = array[i];
array[i] = temp;
}
}
}
Implement Insertion Sort:
Program:
public static void main(String[] args) {
int[] array = {5, 3, 8, 4, 2}
;
insertionSort(array);
System.out.println("Sorted array: " + Arrays.toString(array));
}
public static void insertionSort(int[] array) {
int n = array.length;
for (int i = 1; i < n; i++) {
int key = array[i];
int j = i - 1;
while (j >= 0 && array[j] > key) {
array[j + 1] = array[j];
j--;
}
array[j + 1] = key;
}
}
}
Implement Merge Sort:
Program:
public static void main(String[] args) {
int[] array = {5, 3, 8, 4, 2}
;
mergeSort(array, 0, array.length - 1);
System.out.println("Sorted array: " + Arrays.toString(array));
}
public static void mergeSort(int[] array, int left, int right) {
if (left < right) {
int middle = (left + right) / 2;
mergeSort(array, left, middle);
mergeSort(array, middle + 1, right);
merge(array, left, middle, right);
}
}
public static void merge(int[] array, int left, int middle, int right) {
int n1 = middle - left + 1;
int n2 = right - middle;
int[] leftArray = new int[n1];
int[] rightArray = new int[n2];
for (int i = 0; i < n1; i++) {
leftArray[i] = array[left + i];
}
for (int j = 0; j < n2; j++) {
rightArray[j] = array[middle + 1 + j];
}
int i = 0;
int j = 0;
int k = left;
while (i < n1 && j < n2) {
if (leftArray[i] <= rightArray[j]) {
array[k] = leftArray[i];
i++;
}
else {
array[k] = rightArray[j];
j++;
}
k++;
}
while (i < n1) {
array[k] = leftArray[i];
i++;
k++;
}
while (j < n2) {
array[k] = rightArray[j];
j++;
k++;
}
}
}
Implement Quick Sort:
Program:
public static void main(String[] args) {
int[] array = {5, 3, 8, 4, 2}
;
quickSort(array, 0, array.length - 1);
System.out.println("Sorted array: " + Arrays.toString(array));
}
public static void quickSort(int[] array, int low, int high) {
if (low < high) {
int partitionIndex = partition(array, low, high);
quickSort(array, low, partitionIndex - 1);
quickSort(array, partitionIndex + 1, high);
}
}
public static int partition(int[] array, int low, int high) {
int pivot = array[high];
int i = low - 1;
for (int j = low; j < high; j++) {
if (array[j] <= pivot) {
i++;
int temp = array[i];
array[i] = array[j];
array[j] = temp;
}
}
int temp = array[i + 1];
array[i + 1] = array[high];
array[high] = temp;
return i + 1;
}
}
Implement Linear Search:
Program:
public static void main(String[] args) {
int[] array = {5, 3, 8, 4, 2}
;
int target = 8;
int index = linearSearch(array, target);
if (index != -1) {
System.out.println("Element found at index: " + index);
}
else {
System.out.println("Element not found");
}
}
public static int linearSearch(int[] array, int target) {
for (int i = 0; i < array.length; i++) {
if (array[i] == target) {
return i;
}
}
return -1;
}
}
Implement Binary Search:
Program:
public static void main(String[] args) {
int[] array = {2, 4, 5, 8, 10, 12}
;
int target = 8;
int index = binarySearch(array, target);
if (index != -1) {
System.out.println("Element found at index: " + index);
}
else {
System.out.println("Element not found");
}
}
public static int binarySearch(int[] array, int target) {
int left = 0;
int right = array.length - 1;
while (left <= right) {
int mid = left + (right - left) / 2;
if (array[mid] == target) {
return mid;
}
if (array[mid] < target) {
left = mid + 1;
}
else {
right = mid - 1;
}
}
return -1;
}
}
Calculate Factorial using Recursion:
Program:
public static void main(String[] args) {
int number = 5;
int factorial = calculateFactorial(number);
System.out.println("Factorial of " + number + " is: " + factorial);
}
public static int calculateFactorial(int n) {
if (n == 0) {
return 1;
}
else {
return n * calculateFactorial(n - 1);
}
}
}
Generate Prime Numbers in a Range:
Program:
public static void main(String[] args) {
int lowerBound = 1;
int upperBound = 100;
System.out.println("Prime numbers between " + lowerBound + " and " + upperBound + ":");
printPrimeNumbers(lowerBound, upperBound);
}
public static void printPrimeNumbers(int lowerBound, int upperBound) {
for (int number = lowerBound; number <= upperBound; number++) {
if (isPrime(number)) {
System.out.print(number + " ");
}
}
System.out.println();
}
public static boolean isPrime(int number) {
if (number <= 1) {
return false;
}
for (int i = 2; i <= Math.sqrt(number); i++) {
if (number % i == 0) {
return false;
}
}
return true;
}
}
Check if a Year is Leap Year:
Program:
public static void main(String[] args) {
int year = 2024;
boolean isLeapYear = checkLeapYear(year);
if (isLeapYear) {
System.out.println(year + " is a leap year.");
}
else {
System.out.println(year + " is not a leap year.");
}
}
public static boolean checkLeapYear(int year) {
if (year % 4 == 0) {
if (year % 100 == 0) {
if (year % 400 == 0) {
return true;
}
else {
return false;
}
}
else {
return true;
}
}
else {
return false;
}
}
}
Check if a String is Anagram:
Program:
public class Anagram {
public static void main(String[] args) {
String str1 = "listen";
String str2 = "silent";
boolean isAnagram = checkAnagram(str1, str2);
if (isAnagram) {
System.out.println(str1 + " and " + str2 + " are anagrams.");
}
else {
System.out.println(str1 + " and " + str2 + " are not anagrams.");
}
}
public static boolean checkAnagram(String str1, String str2) {
// Convert strings to character arrays
char[] charArray1 = str1.toLowerCase().toCharArray();
char[] charArray2 = str2.toLowerCase().toCharArray();
// Sort the character arrays
Arrays.sort(charArray1);
Arrays.sort(charArray2);
// Compare the sorted character arrays
return Arrays.equals(charArray1, charArray2);
}
}
Convert Celsius to Fahrenheit:
Program:
public static void main(String[] args) {
double celsius = 25.0;
double fahrenheit = convertCelsiusToFahrenheit(celsius);
System.out.println(celsius + " degrees Celsius is equal to " + fahrenheit + " degrees Fahrenheit.");
}
public static double convertCelsiusToFahrenheit(double celsius) {
return (celsius * 9 / 5) + 32;
}
}
Convert Fahrenheit to Celsius:
Program:
public static void main(String[] args) {
double fahrenheit = 77.0;
double celsius = convertFahrenheitToCelsius(fahrenheit);
System.out.println(fahrenheit + " degrees Fahrenheit is equal to " + celsius + " degrees Celsius.");
}
public static double convertFahrenheitToCelsius(double fahrenheit) {
return (fahrenheit - 32) * 5 / 9;
}
}
Implement Bubble Sort for Strings:
Program:
public static void main(String[] args) {
String[] array = {"apple", "banana", "orange", "grape", "pineapple"}
;
bubbleSort(array);
System.out.println("Sorted array: " + Arrays.toString(array));
}
public static void bubbleSort(String[] array) {
int n = array.length;
for (int i = 0; i < n - 1; i++) {
for (int j = 0; j < n - i - 1; j++) {
if (array[j].compareTo(array[j + 1]) > 0) {
String temp = array[j];
array[j] = array[j + 1];
array[j + 1] = temp;
}
}
}
}
}
Convert Decimal to Binary:
Program:
String binary = convertDecimalToBinary(decimal);
System.out.println(decimal + " in decimal is equal to " + binary + " in binary.");
}
public static String convertDecimalToBinary(int decimal) { return Integer.toBinaryString(decimal);
}
}
Convert Binary to Decimal:
Program:
int decimal = convertBinaryToDecimal(binary); System.out.println(binary + " in binary is equal to " + decimal + " in decimal.");
}
public static int convertBinaryToDecimal(String binary) { return Integer.parseInt(binary, 2);
}
}
Implement Stack Data Structure:
Program:
class Stack {
private List
public Stack() {
stack = new ArrayList<>();
}
public void push(int item) {
stack.add(item);
}
public int pop() {
if (isEmpty()) {
throw new EmptyStackException();
}
return stack.remove(stack.size() - 1);
}
public int peek() {
if (isEmpty()) {
throw new EmptyStackException();
}
return stack.get(stack.size() - 1);
}
public boolean isEmpty() {
return stack.isEmpty();
}
public int size() {
return stack.size();
}
}
public class Main {
public static void main(String[] args) {
Stack stack = new Stack();
stack.push(10);
stack.push(20);
stack.push(30);
System.out.println("Size of stack: " + stack.size());
System.out.println("Pop item: " + stack.pop());
System.out.println("Peek item: " + stack.peek());
System.out.println("Is stack empty? " + stack.isEmpty());
}
}
Implement Queue Data Structure:
Program:
class Queue {
private List
public Queue() {
queue = new ArrayList<>();
}
public void enqueue(int item) {
queue.add(item);
}
public int dequeue() {
if (isEmpty()) {
throw new NoSuchElementException();
}
return queue.remove(0);
}
public int peek() {
if (isEmpty()) {
throw new NoSuchElementException();
}
return queue.get(0);
}
public boolean isEmpty() {
return queue.isEmpty();
}
public int size() {
return queue.size();
}
}
public class Main {
public static void main(String[] args) {
Queue queue = new Queue();
queue.enqueue(10);
queue.enqueue(20);
queue.enqueue(30);
System.out.println("Size of queue: " + queue.size());
System.out.println("Dequeue item: " + queue.dequeue());
System.out.println("Peek item: " + queue.peek());
System.out.println("Is queue empty? " + queue.isEmpty());
}
}
Implement LinkedList Data Structure:
Program:
int data;
Node next;
public Node(int data) {
this.data = data;
next = null;
}
}
class LinkedList {
private Node head;
public LinkedList() {
head = null;
}
public void insert(int data) {
Node newNode = new Node(data);
if (head == null) {
head = newNode;
}
else {
Node current = head;
while (current.next != null) {
current = current.next;
}
current.next = newNode;
}
}
public void display() {
Node current = head;
while (current != null) {
System.out.print(current.data + " ");
current = current.next;
}
System.out.println();
}
}
public class Main {
public static void main(String[] args) {
LinkedList linkedList = new LinkedList();
linkedList.insert(10);
linkedList.insert(20);
linkedList.insert(30);
linkedList.display();
}
}
Implement Binary Tree Data Structure:
Program:
int data;
Node left;
Node right;
public Node(int data) {
this.data = data;
left = null;
right = null;
}
}
class BinaryTree {
private Node root;
public BinaryTree() {
root = null;
}
public void insert(int data) {
root = insertNode(root, data);
}
private Node insertNode(Node current, int data) {
if (current == null) {
return new Node(data);
}
if (data < current.data) {
current.left = insertNode(current.left, data);
}
else if (data > current.data) {
current.right = insertNode(current.right, data);
}
return current;
}
public void inorderTraversal() {
inorder(root);
}
private void inorder(Node current) {
if (current != null) {
inorder(current.left);
System.out.print(current.data + " ");
inorder(current.right);
}
}
}
public class Main {
public static void main(String[] args) {
BinaryTree binaryTree = new BinaryTree();
binaryTree.insert(50);
binaryTree.insert(30);
binaryTree.insert(70);
binaryTree.insert(20);
binaryTree.insert(40);
binaryTree.insert(60);
binaryTree.insert(80);
System.out.println("Inorder Traversal:");
binaryTree.inorderTraversal();
}
}
Implement Binary Search Tree:
Program:
int data;
Node left;
Node right;
public Node(int data) {
this.data = data;
left = null;
right = null;
}
}
class BinarySearchTree {
private Node root;
public BinarySearchTree() {
root = null;
}
public void insert(int data) {
root = insertNode(root, data);
}
private Node insertNode(Node current, int data) {
if (current == null) {
return new Node(data);
}
if (data < current.data) {
current.left = insertNode(current.left, data);
}
else if (data > current.data) {
current.right = insertNode(current.right, data);
}
return current;
}
public boolean search(int data) {
return searchNode(root, data);
}
private boolean searchNode(Node current, int data) {
if (current == null) {
return false;
}
if (data == current.data) {
return true;
}
if (data < current.data) {
return searchNode(current.left, data);
}
else {
return searchNode(current.right, data);
}
}
}
public class Main {
public static void main(String[] args) {
BinarySearchTree bst = new BinarySearchTree();
bst.insert(50);
bst.insert(30);
bst.insert(70);
bst.insert(20);
bst.insert(40);
bst.insert(60);
bst.insert(80);
System.out.println("Search 40: " + bst.search(40));
System.out.println("Search 90: " + bst.search(90));
}
}
Implement Graph Data Structure:
Program:
class Graph {
private int numVertices;
private List
public Graph(int numVertices) {
this.numVertices = numVertices;
adjList = new ArrayList<>(numVertices);
for (int i = 0;
i < numVertices;
i++) {
adjList.add(new ArrayList<>());
}
}
public void addEdge(int source, int destination) {
adjList.get(source).add(destination);
adjList.get(destination).add(source);
}
public void printGraph() {
for (int i = 0;
i < numVertices;
i++) {
List
System.out.print("Vertex " + i + ": ");
for (int vertex : vertices) {
System.out.print(vertex + " ");
}
System.out.println();
}
}
}
public class Main {
public static void main(String[] args) {
int numVertices = 5;
Graph graph = new Graph(numVertices);
graph.addEdge(0, 1);
graph.addEdge(0, 4);
graph.addEdge(1, 2);
graph.addEdge(1, 3);
graph.addEdge(1, 4);
graph.addEdge(2, 3);
graph.addEdge(3, 4);
graph.printGraph();
}
}
Implement Hash Table:
Program:
int key;
int value;
public Entry(int key, int value) {
this.key = key;
this.value = value;
}
}
class HashTable {
private static final int TABLE_SIZE = 10;
private Entry[] table;
public HashTable() {
table = new Entry[TABLE_SIZE];
}
public void put(int key, int value) {
int hash = key % TABLE_SIZE;
while (table[hash] != null && table[hash].key != key) {
hash = (hash + 1) % TABLE_SIZE;
}
table[hash] = new Entry(key, value);
}
public int get(int key) {
int hash = key % TABLE_SIZE;
while (table[hash] != null && table[hash].key != key) {
hash = (hash + 1) % TABLE_SIZE;
}
if (table[hash] != null) {
return table[hash].value;
}
return -1;
}
public void remove(int key) {
int hash = key % TABLE_SIZE;
while (table[hash] != null && table[hash].key != key) {
hash = (hash + 1) % TABLE_SIZE;
}
if (table[hash] != null) {
table[hash] = null;
}
}
}
public class Main {
public static void main(String[] args) {
HashTable hashTable = new HashTable();
hashTable.put(10, 100);
hashTable.put(20, 200);
hashTable.put(30, 300);
System.out.println("Value for key 20: " + hashTable.get(20));
System.out.println("Value for key 40: " + hashTable.get(40));
hashTable.remove(20);
System.out.println("Value for key 20 after removal: " + hashTable.get(20));
}
}
Implement Trie Data Structure:
Program:
private static final int ALPHABET_SIZE = 26;
private TrieNode[] children;
private boolean isEndOfWord;
public TrieNode() {
children = new TrieNode[ALPHABET_SIZE];
isEndOfWord = false;
}
public void insert(String word) {
TrieNode current = this;
for (char c : word.toCharArray()) {
int index = c - 'a';
if (current.children[index] == null) {
current.children[index] = new TrieNode();
}
current = current.children[index];
}
current.isEndOfWord = true;
}
public boolean search(String word) {
TrieNode current = this;
for (char c : word.toCharArray()) {
int index = c - 'a';
if (current.children[index] == null) {
return false;
}
current = current.children[index];
}
return current.isEndOfWord;
}
}
public class Main {
public static void main(String[] args) {
TrieNode root = new TrieNode();
root.insert("apple");
root.insert("banana");
root.insert("orange");
System.out.println("Search for 'apple': " + root.search("apple"));
System.out.println("Search for 'grape': " + root.search("grape"));
}
}
Implement Heap Data Structure:
Program:
private int[] heap;
private int size;
private int capacity;
public MinHeap(int capacity) {
this.capacity = capacity;
heap = new int[capacity];
size = 0;
}
public int getParentIndex(int i) {
return (i - 1) / 2;
}
public int getLeftChildIndex(int i) {
return 2 * i + 1;
}
public int getRightChildIndex(int i) {
return 2 * i + 2;
}
public boolean hasParent(int i) {
return getParentIndex(i) >= 0;
}
public boolean hasLeftChild(int i) {
return getLeftChildIndex(i) < size;
}
public boolean hasRightChild(int i) {
return getRightChildIndex(i) < size;
}
public int getParent(int i) {
return heap[getParentIndex(i)];
}
public int getLeftChild(int i) {
return heap[getLeftChildIndex(i)];
}
public int getRightChild(int i) {
return heap[getRightChildIndex(i)];
}
public void swap(int i, int j) {
int temp = heap[i];
heap[i] = heap[j];
heap[j] = temp;
}
public void insert(int item) {
if (size == capacity) {
throw new IllegalStateException("Heap is full");
}
heap[size] = item;
size++;
heapifyUp(size - 1);
}
public int extractMin() {
if (size == 0) {
throw new IllegalStateException("Heap is empty");
}
int minItem = heap[0];
heap[0] = heap[size - 1];
size--;
heapifyDown(0);
return minItem;
}
public void heapifyUp(int i) {
while (hasParent(i) && getParent(i) > heap[i]) {
int parentIndex = getParentIndex(i);
swap(i, parentIndex);
i = parentIndex;
}
}
public void heapifyDown(int i) {
while (hasLeftChild(i)) {
int smallerChildIndex = getLeftChildIndex(i);
if (hasRightChild(i) && getRightChild(i) < getLeftChild(i)) {
smallerChildIndex = getRightChildIndex(i);
}
if (heap[i] < heap[smallerChildIndex]) {
break;
}
else {
swap(i, smallerChildIndex);
}
i = smallerChildIndex;
}
}
}
public class Main {
public static void main(String[] args) {
MinHeap minHeap = new MinHeap(10);
minHeap.insert(4);
minHeap.insert(8);
minHeap.insert(2);
minHeap.insert(6);
minHeap.insert(10);
minHeap.insert(1);
System.out.println("Extracted Min: " + minHeap.extractMin());
}
}
Implement Dijkstra's Algorithm:
Program:
class Graph {
private int numVertices;
private List
public Graph(int numVertices) {
this.numVertices = numVertices;
adjList = new ArrayList<>(numVertices);
for (int i = 0;
i < numVertices;
i++) {
adjList.add(new ArrayList<>());
}
}
public void addEdge(int source, int destination, int weight) {
adjList.get(source).add(new Node(destination, weight));
adjList.get(destination).add(new Node(source, weight));
}
public int[] dijkstra(int source) {
int[] distances = new int[numVertices];
Arrays.fill(distances, Integer.MAX_VALUE);
distances[source] = 0;
PriorityQueue
pq.offer(new Node(source, 0));
while (!pq.isEmpty()) {
Node current = pq.poll();
int vertex = current.vertex;
int weight = current.weight;
if (weight > distances[vertex]) {
continue;
}
for (Node neighbor : adjList.get(vertex)) {
int newDistance = distances[vertex] + neighbor.weight;
if (newDistance < distances[neighbor.vertex]) {
distances[neighbor.vertex] = newDistance;
pq.offer(new Node(neighbor.vertex, newDistance));
}
}
}
return distances;
}
static class Node {
int vertex;
int weight;
public Node(int vertex, int weight) {
this.vertex = vertex;
this.weight = weight;
}
}
}
public class Main {
public static void main(String[] args) {
int numVertices = 6;
Graph graph = new Graph(numVertices);
graph.addEdge(0, 1, 2);
graph.addEdge(0, 2, 4);
graph.addEdge(1, 2, 1);
graph.addEdge(1, 3, 7);
graph.addEdge(2, 4, 3);
graph.addEdge(3, 4, 1);
graph.addEdge(3, 5, 5);
graph.addEdge(4, 5, 2);
int source = 0;
int[] distances = graph.dijkstra(source);
System.out.println("Shortest distances from source vertex " + source + ":");
for (int i = 0;
i < numVertices;
i++) {
System.out.println("Vertex " + i + ": " + distances[i]);
}
}
}
Implement Breadth-First Search (BFS):
Program:
class Graph {
private int numVertices;
private List
public Graph(int numVertices) {
this.numVertices = numVertices;
adjList = new ArrayList<>(numVertices);
for (int i = 0;
i < numVertices;
i++) {
adjList.add(new ArrayList<>());
}
}
public void addEdge(int source, int destination) {
adjList.get(source).add(destination);
adjList.get(destination).add(source);
}
public void bfs(int startVertex) {
boolean[] visited = new boolean[numVertices];
Queue
visited[startVertex] = true;
queue.offer(startVertex);
while (!queue.isEmpty()) {
int currentVertex = queue.poll();
System.out.print(currentVertex + " ");
for (int neighbor : adjList.get(currentVertex)) {
if (!visited[neighbor]) {
visited[neighbor] = true;
queue.offer(neighbor);
}
}
}
}
}
public class Main {
public static void main(String[] args) {
int numVertices = 7;
Graph graph = new Graph(numVertices);
graph.addEdge(0, 1);
graph.addEdge(0, 2);
graph.addEdge(1, 3);
graph.addEdge(1, 4);
graph.addEdge(2, 5);
graph.addEdge(2, 6);
int startVertex = 0;
System.out.println("BFS Traversal:");
graph.bfs(startVertex);
}
}
Implement Depth-First Search (DFS):
Program:
class Graph {
private int numVertices;
private List
public Graph(int numVertices) {
this.numVertices = numVertices;
adjList = new ArrayList<>(numVertices);
for (int i = 0;
i < numVertices;
i++) {
adjList.add(new ArrayList<>());
}
}
public void addEdge(int source, int destination) {
adjList.get(source).add(destination);
adjList.get(destination).add(source);
}
public void dfs(int startVertex) {
boolean[] visited = new boolean[numVertices];
dfsUtil(startVertex, visited);
}
private void dfsUtil(int currentVertex, boolean[] visited) {
visited[currentVertex] = true;
System.out.print(currentVertex + " ");
for (int neighbor : adjList.get(currentVertex)) {
if (!visited[neighbor]) {
dfsUtil(neighbor, visited);
}
}
}
}
public class Main {
public static void main(String[] args) {
int numVertices = 7;
Graph graph = new Graph(numVertices);
graph.addEdge(0, 1);
graph.addEdge(0, 2);
graph.addEdge(1, 3);
graph.addEdge(1, 4);
graph.addEdge(2, 5);
graph.addEdge(2, 6);
int startVertex = 0;
System.out.println("DFS Traversal:");
graph.dfs(startVertex);
}
}
Implement Caesar Cipher:
Program:
public static String encrypt(String plaintext, int shift) {
StringBuilder ciphertext = new StringBuilder();
for (char c : plaintext.toCharArray()) {
if (Character.isLetter(c)) {
char shiftedChar = (char) (((c - 'a' + shift) % 26) + 'a');
ciphertext.append(shiftedChar);
}
else {
ciphertext.append(c);
}
}
return ciphertext.toString();
}
public static String decrypt(String ciphertext, int shift) {
StringBuilder plaintext = new StringBuilder();
for (char c : ciphertext.toCharArray()) {
if (Character.isLetter(c)) {
char shiftedChar = (char) (((c - 'a' - shift + 26) % 26) + 'a');
plaintext.append(shiftedChar);
}
else {
plaintext.append(c);
}
}
return plaintext.toString();
}
}
public class Main {
public static void main(String[] args) {
String plaintext = "hello";
int shift = 3;
String ciphertext = CaesarCipher.encrypt(plaintext, shift);
System.out.println("Encrypted Text: " + ciphertext);
String decryptedText = CaesarCipher.decrypt(ciphertext, shift);
System.out.println("Decrypted Text: " + decryptedText);
}
}
Implement RSA Encryption Algorithm:
Program:
import java.util.Random;
class RSA {
private BigInteger p;
private BigInteger q;
private BigInteger n;
private BigInteger phi;
private BigInteger e;
private BigInteger d;
public RSA() {
Random random = new Random();
p = BigInteger.probablePrime(16, random);
q = BigInteger.probablePrime(16, random);
n = p.multiply(q);
phi = p.subtract(BigInteger.ONE).multiply(q.subtract(BigInteger.ONE));
e = BigInteger.valueOf(65537);
// commonly used public exponent d = e.modInverse(phi);
}
public BigInteger encrypt(BigInteger plaintext) {
return plaintext.modPow(e, n);
}
public BigInteger decrypt(BigInteger ciphertext) {
return ciphertext.modPow(d, n);
}
}
public class Main {
public static void main(String[] args) {
RSA rsa = new RSA();
BigInteger plaintext = BigInteger.valueOf(12345);
BigInteger ciphertext = rsa.encrypt(plaintext);
System.out.println("Encrypted Text: " + ciphertext);
BigInteger decryptedText = rsa.decrypt(ciphertext);
System.out.println("Decrypted Text: " + decryptedText);
}
}
Voting System Simulation:
Program:
public class VotingSystem {
public static void main(String[] args) {
Scanner scanner = new Scanner(System.in);
System.out.println("Welcome to the Voting System");
System.out.print("Enter the number of candidates: ");
int numCandidates = scanner.nextInt();
String[] candidates = new String[numCandidates];
int[] votes = new int[numCandidates];
for (int i = 0;
i < numCandidates;
i++) {
System.out.print("Enter the name of candidate " + (i+1) + ": ");
candidates[i] = scanner.next();
votes[i] = 0;
}
System.out.print("Enter the number of voters: ");
int numVoters = scanner.nextInt();
for (int i = 0;
i < numVoters;
i++) {
System.out.println("Vote #" + (i+1));
System.out.println("Choose your candidate:");
for (int j = 0;
j < numCandidates;
j++) {
System.out.println((j+1) + ". " + candidates[j]);
}
System.out.print("Enter your choice: ");
int choice = scanner.nextInt();
if (choice >= 1 && choice <= numCandidates) {
votes[choice-1]++;
System.out.println("Vote recorded!");
}
else {
System.out.println("Invalid choice. Vote not recorded.");
}
}
System.out.println("Voting Results:");
for (int i = 0;
i < numCandidates;
i++) {
System.out.println(candidates[i] + ": " + votes[i] + " votes");
}
scanner.close();
}
}
Tic-Tac-Toe Game:
Program:
public class TicTacToe {
private static final int SIZE = 3;
private static final char EMPTY = ' ';
private static final char X = 'X';
private static final char O = 'O';
private static char[][] board;
private static char currentPlayer;
public static void main(String[] args) {
board = new char[SIZE][SIZE];
currentPlayer = X;
initializeBoard();
printBoard();
Scanner scanner = new Scanner(System.in);
while (true) {
System.out.println("Player " + currentPlayer + "'s turn");
System.out.print("Enter row (0-" + (SIZE - 1) + "): ");
int row = scanner.nextInt();
System.out.print("Enter column (0-" + (SIZE - 1) + "): ");
int column = scanner.nextInt();
if (isValidMove(row, column)) {
makeMove(row, column);
printBoard();
if (isGameOver()) {
char winner = getWinner();
if (winner == EMPTY) {
System.out.println("It's a draw!");
}
else {
System.out.println("Player " + winner + " wins!");
}
break;
}
else {
switchPlayer();
}
}
else {
System.out.println("Invalid move. Try again.");
}
}
scanner.close();
}
private static void initializeBoard() {
for (int i = 0;
i < SIZE;
i++) {
for (int j = 0;
j < SIZE;
j++) {
board[i][j] = EMPTY;
}
}
}
private static void printBoard() {
for (int i = 0;
i < SIZE;
i++) {
for (int j = 0;
j < SIZE;
j++) {
System.out.print(board[i][j] + " ");
}
System.out.println();
}
System.out.println();
}
private static boolean isValidMove(int row, int column) {
return row >= 0 && row < SIZE && column >= 0 && column < SIZE && board[row][column] == EMPTY;
}
private static void makeMove(int row, int column) {
board[row][column] = currentPlayer;
}
private static boolean isGameOver() {
return isBoardFull() || hasPlayerWon(X) || hasPlayerWon(O);
}
private static boolean isBoardFull() {
for (int i = 0;
i < SIZE;
i++) {
for (int j = 0;
j < SIZE;
j++) {
if (board[i][j] == EMPTY) {
return false;
}
}
}
return true;
}
private static boolean hasPlayerWon(char player) {
// Check rows for (int i = 0;
i < SIZE;
i++) {
if (board[i][0] == player && board[i][1] == player && board[i][2] == player) {
return true;
}
}
// Check columns for (int j = 0;
j < SIZE;
j++) {
if (board[0][j] == player && board[1][j] == player && board[2][j] == player) {
return true;
}
}
// Check diagonals if (board[0][0] == player && board[1][1] == player && board[2][2] == player) {
return true;
}
if (board[0][2] == player && board[1][1] == player && board[2][0] == player) {
return true;
}
return false;
}
private static char getWinner() {
if (hasPlayerWon(X)) {
return X;
}
else if (hasPlayerWon(O)) {
return O;
}
else {
return EMPTY;
}
}
private static void switchPlayer() {
currentPlayer = (currentPlayer == X) ? O : X;
}
}
Hangman Game: Implement the classic Hangman game, where players guess a word by guessing individual letters within a certain number of attempts.
Program:
public class HangmanGame {
private static final String[] WORDS = {
"programming", "java", "computer", "algorithm", "variable"}
;
private static final int MAX_ATTEMPTS = 6;
public static void main(String[] args) {
Scanner scanner = new Scanner(System.in);
String word = selectRandomWord();
char[] guessedLetters = new char[word.length()];
int attempts = 0;
boolean gameWon = false;
System.out.println("Welcome to Hangman!");
System.out.println("Guess the letters to complete the word.");
while (attempts < MAX_ATTEMPTS && !gameWon) {
System.out.println();
displayHangman(attempts);
displayWordProgress(guessedLetters);
System.out.print("Enter a letter: ");
char guess = scanner.next().charAt(0);
if (isLetterGuessed(guess, guessedLetters)) {
System.out.println("You already guessed that letter!");
continue;
}
boolean correctGuess = checkGuess(guess, word, guessedLetters);
if (correctGuess) {
gameWon = checkGameWon(guessedLetters);
}
else {
attempts++;
}
}
System.out.println();
displayHangman(attempts);
displayWordProgress(guessedLetters);
if (gameWon) {
System.out.println("Congratulations! You guessed the word correctly: " + word);
}
else {
System.out.println("Game over! The word was: " + word);
}
scanner.close();
}
private static String selectRandomWord() {
int randomIndex = (int) (Math.random() * WORDS.length);
return WORDS[randomIndex];
}
private static void displayHangman(int attempts) {
String[] hangmanArt = {
" +---+\n | |\n |\n |\n |\n |\n=========", " +---+\n | |\n O |\n |\n |\n |\n=========", " +---+\n | |\n O |\n | |\n |\n |\n=========", " +---+\n | |\n O |\n /| |\n |\n |\n=========", " +---+\n | |\n O |\n /|\\ |\n |\n |\n=========", " +---+\n | |\n O |\n /|\\ |\n / |\n |\n=========", " +---+\n | |\n O |\n /|\\ |\n / \\ |\n |\n=========" }
;
System.out.println(hangmanArt[attempts]);
}
private static void displayWordProgress(char[] guessedLetters) {
System.out.print("Word: ");
for (char letter : guessedLetters) {
System.out.print(letter != 0 ? letter : "_");
}
System.out.println();
}
private static boolean isLetterGuessed(char guess, char[] guessedLetters) {
for (char letter : guessedLetters) {
if (letter == guess) {
return true;
}
}
return false;
}
private static boolean checkGuess(char guess, String word, char[] guessedLetters) {
boolean correctGuess = false;
for (int i = 0;
i < word.length();
i++) {
if (word.charAt(i) == guess) {
guessedLetters[i] = guess;
correctGuess = true;
}
}
return correctGuess;
}
private static boolean checkGameWon(char[] guessedLetters) {
for (char letter : guessedLetters) {
if (letter == 0) {
return false;
}
}
return true;
}
}
In this implementation, the game selects a random word from a predefined list, and the player has to guess individual letters to complete the word. The hangman art is displayed based on the number of incorrect attempts. The game continues until the player guesses the word correctly or reaches the maximum number of attempts.
Please note that this is a basic implementation, and you can enhance it further by adding features like input validation, word categories, and more sophisticated graphics.
Number Guessing Game: Develop a game where the program generates a random number, and the player has to guess the number within a specified range.
Program:
public class NumberGuessingGame {
public static void main(String[] args) {
Scanner scanner = new Scanner(System.in);
int minRange = 1;
int maxRange = 100;
int randomNumber = generateRandomNumber(minRange, maxRange);
int attempts = 0;
boolean guessedCorrectly = false;
System.out.println("Welcome to the Number Guessing Game!");
System.out.println("Guess the number between " + minRange + " and " + maxRange + ".");
while (!guessedCorrectly) {
System.out.print("Enter your guess: ");
int guess = scanner.nextInt();
attempts++;
if (guess == randomNumber) {
System.out.println("Congratulations! You guessed the correct number in " + attempts + " attempts.");
guessedCorrectly = true;
}
else if (guess < randomNumber) {
System.out.println("Too low! Try again.");
}
else {
System.out.println("Too high! Try again.");
}
}
scanner.close();
}
private static int generateRandomNumber(int min, int max) {
return (int) (Math.random() * (max - min + 1)) + min;
}
}
In this game, the program generates a random number within a specified range (in this example, between 1 and 100). The player has to guess the number, and the program provides feedback whether the guess is too low or too high. The game continues until the player guesses the correct number.
You can customize the range of numbers by modifying the minRange and maxRange variables in the code.
Feel free to modify and enhance the game as per your requirements, such as adding difficulty levels, score tracking, or user interface improvements.
Maze Solver: Create a program that generates random mazes and solves them using algorithms like Depth-First Search or Breadth-First Search.
Program:
public class MazeSolver {
private static final char WALL = '#';
private static final char START = 'S';
private static final char END = 'E';
private static final char PATH = '.';
private static final char VISITED = 'X';
private char[][] maze;
private int startRow;
private int startCol;
private int endRow;
private int endCol;
public MazeSolver(char[][] maze) {
this.maze = maze;
}
public boolean solveMaze() {
Stack
Coordinate start = new Coordinate(startRow, startCol);
stack.push(start);
while (!stack.isEmpty()) {
Coordinate current = stack.pop();
int row = current.getRow();
int col = current.getCol();
if (maze[row][col] == END) {
return true;
// Maze solved }
if (isValidMove(row, col)) {
maze[row][col] = VISITED;
stack.push(new Coordinate(row + 1, col));
// Down stack.push(new Coordinate(row - 1, col));
// Up stack.push(new Coordinate(row, col + 1));
// Right stack.push(new Coordinate(row, col - 1));
// Left }
}
return false;
// Maze cannot be solved }
private boolean isValidMove(int row, int col) {
int numRows = maze.length;
int numCols = maze[0].length;
return (row >= 0 && row < numRows && col >= 0 && col < numCols && (maze[row][col] == PATH || maze[row][col] == END));
}
public void printMaze() {
for (char[] row : maze) {
for (char cell : row) {
System.out.print(cell + " ");
}
System.out.println();
}
}
public static void main(String[] args) {
char[][] maze = {
{
WALL, WALL, WALL, WALL, WALL, WALL, WALL, WALL, WALL, WALL }
, {
START, PATH, WALL, PATH, WALL, PATH, PATH, PATH, PATH, WALL }
, {
WALL, PATH, WALL, PATH, WALL, PATH, WALL, WALL, PATH, WALL }
, {
WALL, PATH, PATH, PATH, PATH, PATH, WALL, WALL, PATH, WALL }
, {
WALL, WALL, WALL, WALL, WALL, PATH, WALL, WALL, PATH, WALL }
, {
WALL, PATH, PATH, PATH, WALL, PATH, PATH, PATH, PATH, WALL }
, {
WALL, PATH, WALL, PATH, WALL, WALL, WALL, WALL, WALL, WALL }
, {
WALL, PATH, WALL, PATH, PATH, PATH, PATH, PATH, PATH, END }
, {
WALL, WALL, WALL, WALL, WALL, WALL, WALL, WALL, WALL, WALL }
}
;
MazeSolver solver = new MazeSolver(maze);
System.out.println("Original Maze:");
solver.printMaze();
if (solver.solveMaze()) {
System.out.println("Maze Solved:");
solver.printMaze();
}
else {
System.out.println("Cannot solve the maze.");
}
}
private static class Coordinate {
private int row;
private int col;
public Coordinate(int row, int col) {
this.row = row;
this.col = col;
}
public int getRow() {
return row;
}
public int getCol() {
return col;
}
}
}
In this program, a maze is represented using a 2D char array. The maze contains walls (#), a starting point (S), an ending point (E), and paths (.). The solveMaze() method implements the Depth-First Search algorithm to find a path from the starting point to the ending point. If a path is found, true is returned, and the solved maze is printed. If no path is found, false is returned.
You can modify the maze array to create different maze configurations. Run the program to see the original maze and the solved maze.
Feel free to experiment with different maze generation algorithms, such as using random maze generation techniques or implementing other search algorithms like Breadth-First Search.
Blood Donation Management: Develop a system to manage blood donation records, including donor information, blood types, and availability
Program:
import java.util.List;
import java.util.Scanner;
class Donor {
private String name;
private String bloodType;
private boolean available;
public Donor(String name, String bloodType, boolean available) {
this.name = name;
this.bloodType = bloodType;
this.available = available;
}
public String getName() {
return name;
}
public String getBloodType() {
return bloodType;
}
public boolean isAvailable() {
return available;
}
@Override public String toString() {
return "Name: " + name + ", Blood Type: " + bloodType + ", Availability: " + (available ? "Available" : "Not Available");
}
}
public class BloodDonationManagement {
private List
public BloodDonationManagement() {
donors = new ArrayList<>();
}
public void addDonor(Donor donor) {
donors.add(donor);
}
public List
List
for (Donor donor : donors) {
if (donor.getBloodType().equalsIgnoreCase(bloodType) && donor.isAvailable() == available) {
matchingDonors.add(donor);
}
}
return matchingDonors;
}
public static void main(String[] args) {
BloodDonationManagement bloodBank = new BloodDonationManagement();
Scanner scanner = new Scanner(System.in);
// Menu while (true) {
System.out.println("Blood Donation Management");
System.out.println("1. Add Donor");
System.out.println("2. Search Donors");
System.out.println("3. Exit");
System.out.print("Enter your choice: ");
int choice = scanner.nextInt();
scanner.nextLine();
// Consume newline switch (choice) {
case 1: System.out.print("Enter donor name: ");
String name = scanner.nextLine();
System.out.print("Enter donor blood type: ");
String bloodType = scanner.nextLine();
System.out.print("Is the donor available? (true/false): ");
boolean available = scanner.nextBoolean();
scanner.nextLine();
// Consume newline Donor donor = new Donor(name, bloodType, available);
bloodBank.addDonor(donor);
System.out.println("Donor added successfully!");
break;
case 2: System.out.print("Enter blood type to search: ");
String searchBloodType = scanner.nextLine();
System.out.print("Enter availability (true/false): ");
boolean searchAvailability = scanner.nextBoolean();
scanner.nextLine();
// Consume newline List
if (searchResults.isEmpty()) {
System.out.println("No matching donors found.");
}
else {
System.out.println("Matching Donors:");
for (Donor d : searchResults) {
System.out.println(d);
}
}
break;
case 3: System.out.println("Exiting...");
System.exit(0);
break;
default: System.out.println("Invalid choice. Please try again.");
}
System.out.println();
// Print empty line for separation }
}
}
This program uses the Donor class to represent a blood donor with properties like name, blood type, and availability. The BloodDonationManagement class manages a list of donors and provides methods to add donors and search for matching donors based on blood type and availability. The program utilizes a simple menu-driven approach using Scanner to interact with the user.
You can run the program and use the menu options to add donors and search for donors based on blood type and availability.
Feel free to enhance the program with additional features such as data persistence, editing/deleting donors, and more sophisticated search capabilities based on location or other criteria.
Library Management System: Create a program to manage library resources, including books, borrowing, returning, and searching for books.
Here's a Java program that demonstrates a basic library management system. It allows you to add books to the library, borrow books, return books, and search for books based on different criteria. Please note that this is a simplified example for demonstration purposes and may not include all the necessary functionalities or error handling. You can build upon this code to develop a more comprehensive library management system.
Program:
import java.util.List;
import java.util.Scanner;
class Book {
private String title;
private String author;
private boolean available;
public Book(String title, String author) {
this.title = title;
this.author = author;
this.available = true;
}
public String getTitle() {
return title;
}
public String getAuthor() {
return author;
}
public boolean isAvailable() {
return available;
}
public void setAvailable(boolean available) {
this.available = available;
}
@Override public String toString() {
return "Title: " + title + ", Author: " + author + ", Availability: " + (available ? "Available" : "Not Available");
}
}
public class LibraryManagementSystem {
private List
public LibraryManagementSystem() {
books = new ArrayList<>();
}
public void addBook(Book book) {
books.add(book);
}
public void borrowBook(String title) {
for (Book book : books) {
if (book.getTitle().equalsIgnoreCase(title) && book.isAvailable()) {
book.setAvailable(false);
System.out.println("Book borrowed successfully!");
return;
}
}
System.out.println("Book not found or not available for borrowing.");
}
public void returnBook(String title) {
for (Book book : books) {
if (book.getTitle().equalsIgnoreCase(title) && !book.isAvailable()) {
book.setAvailable(true);
System.out.println("Book returned successfully!");
return;
}
}
System.out.println("Book not found or already returned.");
}
public List
List
for (Book book : books) {
if (book.getTitle().toLowerCase().contains(title.toLowerCase())) {
matchingBooks.add(book);
}
}
return matchingBooks;
}
public List
List
for (Book book : books) {
if (book.getAuthor().toLowerCase().contains(author.toLowerCase())) {
matchingBooks.add(book);
}
}
return matchingBooks;
}
public static void main(String[] args) {
LibraryManagementSystem library = new LibraryManagementSystem();
Scanner scanner = new Scanner(System.in);
// Menu while (true) {
System.out.println("Library Management System");
System.out.println("1. Add Book");
System.out.println("2. Borrow Book");
System.out.println("3. Return Book");
System.out.println("4. Search Books by Title");
System.out.println("5. Search Books by Author");
System.out.println("6. Exit");
System.out.print("Enter your choice: ");
int choice = scanner.nextInt();
scanner.nextLine();
// Consume newline switch (choice) {
case 1: System.out.print("Enter book title: ");
String title = scanner.nextLine();
System.out.print("Enter book author: ");
String author = scanner.nextLine();
Book book = new Book(title, author);
library.addBook(book);
System.out.println("Book added successfully!");
break;
case 2: System.out.print("Enter book title to borrow: ");
String borrowTitle = scanner.nextLine();
library.borrowBook(borrowTitle);
break;
case 3: System.out.print("Enter book title to return: ");
String returnTitle = scanner.nextLine();
library.returnBook(returnTitle);
break;
case 4: System.out.print("Enter title keyword to search: ");
String searchTitle = scanner.nextLine();
List
if (titleSearchResults.isEmpty()) {
System.out.println("No matching books found.");
}
else {
System.out.println("Matching Books:");
for (Book b : titleSearchResults) {
System.out.println(b);
}
}
break;
case 5: System.out.print("Enter author keyword to search: ");
String searchAuthor = scanner.nextLine();
List
if (authorSearchResults.isEmpty()) {
System.out.println("No matching books found.");
}
else {
System.out.println("Matching Books:");
for (Book b : authorSearchResults) {
System.out.println(b);
}
}
break;
case 6: System.out.println("Exiting...");
System.exit(0);
break;
default: System.out.println("Invalid choice. Please try again.");
}
System.out.println();
// Print empty line for separation }
}
}
Java OOPs Concepts
- Definition:A class is a blueprint or template for creating objects, which represent real-world entities. An object is an instance of a class.
- Definition:Inheritance is a mechanism in which one class inherits the properties and methods of another class, allowing code reuse and creating a parent-child relationship between classes.
- Definition: Polymorphism refers to the ability of an object to take many forms. It allows objects of different classes to be treated as objects of a common superclass, resulting in code flexibility and extensibility.
- Definition: Abstraction is a concept that focuses on hiding the internal implementation details of a class and exposing only the relevant information or functionality to the outside world. It helps in creating more manageable and modular code.
- Definition: Encapsulation is a mechanism of bundling data and methods together in a class and restricting access to the internal data from outside the class. It helps in data hiding, ensuring data integrity, and providing controlled access to class members.
Class and Object:
Example:
String brand;
String color;
void drive() {
System.out.println("Driving the " + color + " " + brand);
}
}
public class Main {
public static void main(String[] args) {
Car myCar = new Car();
myCar.brand = "Toyota";
myCar.color = "Red";
myCar.drive();
}
}
Inheritance:
Example:
protected String species;
public Animal(String species) {
this.species = species;
}
public void sound() {
System.out.println("Animal makes a sound");
}
}
class Dog extends Animal {
public Dog() {
super("Dog");
}
public void sound() {
System.out.println("Dog barks");
}
}
public class Main {
public static void main(String[] args) {
Animal animal = new Dog();
animal.sound();
}
}
Polymorphism:
Example:
public int add(int a, int b) {
return a + b;
}
public int add(int a, int b, int c) {
return a + b + c;
}
public void display() {
System.out.println("This is the Calculator class");
}
}
class ScientificCalculator extends Calculator {
public int add(int a, int b) {
return super.add(a, b) + 100;
}
public void display() {
System.out.println("This is the ScientificCalculator class");
}
}
public class Main {
public static void main(String[] args) {
Calculator calculator1 = new Calculator();
Calculator calculator2 = new ScientificCalculator();
System.out.println("Result 1: " + calculator1.add(5, 10));
System.out.println("Result 2: " + calculator2.add(5, 10));
calculator1.display();
calculator2.display();
}
}
Abstraction:
Example:
abstract void sound();
}
class Dog extends Animal {
void sound() {
System.out.println("Dog barks");
}
}
public class Main {
public static void main(String[] args) {
Animal animal = new Dog();
animal.sound();
}
}
Encapsulation:
Example:
private String name;
private int age;
public String getName() {
return name;
}
public void setName(String name) {
this.name = name;
}
public int getAge() {
return age;
}
public void setAge(int age) {
this.age = age;
}
}
public class Main {
public static void main(String[] args) {
Employee employee = new Employee();
employee.setName("John");
employee.setAge(30);
System.out.println("Employee Name: " + employee.getName());
System.out.println("Employee Age: " + employee.getAge());
}
}
Java Method
Modifier:
It specifies the access level and behavior of the method. Examples of modifiers are public, private, protected, and static. They define the visibility and accessibility of the methodReturn Type:
It specifies the type of value returned by the method after execution. If the method does not return any value, the return type is declared as void.Method Name:
It is the identifier that is used to call the method. It should follow the naming conventions and describe the purpose of the method.Parameter List:
It is a comma-separated list of input parameters that the method accepts. Parameters are optional, and a method can have zero or more parameters. Each parameter is declared with its data type and name.Method Body:
It contains the set of statements that are executed when the method is called. It defines the behavior and functionality of the method. The method body is enclosed within curly braces ({ }).Return Statement:
It is used to return a value from the method. If the return type is void, the return statement is optional. If the return type is any other data type, the return statement must be used to return a value of that type.
In Java, a method is a block of code that performs a specific task. It is a reusable component of a class that can be called to execute a sequence of statements. Methods are used to break down complex logic into smaller, more manageable pieces and promote code reuse.
Syntax of a Method:
// Method body
// Statements to be executed
// Optional return statement
}
Let's break down the syntax:
Method without parameters and return type:
Example
System.out.println("Hello, World!");
}
In this example, the method "greet" does not accept any parameters and does not return any value. It simply prints "Hello, World!" when called.
Method with parameters and return type:
Example
return a + b;
}
In this example, the method "sum" accepts two integer parameters, "a" and "b". It returns the sum of these two numbers when called.
Method with parameters and void return type:
Example
System.out.println("Name: " + name);
}
In this example, the method "printName" accepts a String parameter "name". It prints the name when called, but does not return any value.
Method with no parameters but with a return type:
Example
return "Hello, Java!";
}
In this example, the method "getGreeting" does not accept any parameters. It returns a String value "Hello, Java!" when called.
Constructor in java
Modifier:
The modifier is usually declared as public to allow the constructor to be accessed from any part of the program. However, it can also be declared with other access modifiers like private or protected, depending on the desired visibility.ClassName:
The ClassName should be the same as the class name to which the constructor belongs. It helps Java identify that the method is a constructor.Parameters:
Parameters are optional and allow you to pass values to the constructor during object creation. You can have zero or more parameters. Each parameter is declared with its data type and name.Initialization code:
The initialization code inside the constructor is executed when the object is created. It can include assignments, method calls, or any other necessary initialization logic.
In Java, a constructor is a special method that is used to initialize objects of a class. It is called automatically when an object of the class is created. The primary purpose of a constructor is to set the initial state or values of the object's instance variables.
A constructor has the same name as the class and does not have any return type, not even void. It is typically declared as public to allow the object creation from anywhere within the program.
Syntax
// Initialization code
}
Let's break down the syntax:
Constructor without parameters:
Example
private String name;
private int age;
public Person() {
name = "John Doe";
age = 30;
}
}
In this example, the class `Person` has a default constructor that does not accept any parameters. It initializes the `name` to "John Doe" and `age` to 30 by default when an object of the `Person` class is created.
Constructor with parameters:
Example
private String name;
private int age;
public Person(String n, int a) {
name = n;
age = a;
}
}
In this example, the class `Person` has a parameterized constructor that accepts a `String` parameter `n` for the name and an `int` parameter `a` for the age. It assigns the values of `name` and `age` based on the provided arguments when an object of the `Person` class is created.
Constructor chaining:
Example
private String name;
private int age;
public Person() {
this("Ravindra", 30);
}
public Person(String n, int a) {
name = n;
age = a;
}
}
In this example, the class `Person` has two constructors. The default constructor chains to the parameterized constructor using the `this` keyword to avoid code duplication. It sets the default values of `name` and `age` by calling the parameterized constructor with appropriate arguments.
Constructors are essential for object initialization and allow you to provide initial values for instance variables or perform any necessary setup tasks. They play a vital role in the object-oriented programming paradigm and are invoked implicitly during object creation.
static keyword
In Java, the `static` keyword is used to declare a member (variable or method) that belongs to the class itself, rather than to an instance of the class. When a member is declared as static, it means that the member is shared among all instances of the class and can be accessed directly through the class name.
Static Variables:
A static variable, also known as a class variable, is shared by all instances of the class. It is stored in a single memory location, regardless of how many objects of the class are created. Static variables are typically used for values that are common to all objects, such as constants or counters.
Example
private static int count;
// static variable public Counter() {
count++;
}
public static int getCount() {
// static method return count;
}
}
public class Main {
public static void main(String[] args) {
Counter c1 = new Counter();
Counter c2 = new Counter();
Counter c3 = new Counter();
System.out.println("Count: " + Counter.getCount());
// accessing static method }
}
In this example, the class `Counter` has a static variable `count` that keeps track of the number of `Counter` objects created. The constructor increments the `count` variable each time an object is created. The static method `getCount()` returns the current count value. In the `main` method, we create three `Counter` objects and display the count using the static method.
Static Methods:
A static method is associated with the class itself rather than with a specific instance of the class. It can be called directly using the class name, without the need to create an object of the class. Static methods cannot access non-static variables or methods, as they do not have access to instance-specific data.
Example
public static int add(int a, int b) {
// static method return a + b;
}
}
public class Main {
public static void main(String[] args) {
int result = MathUtils.add(5, 3);
// calling static method System.out.println("Result: " + result);
}
}
In this example, the class `MathUtils` has a static method `add()` that performs addition of two numbers. We can directly call the static method using the class name `MathUtils.add(5, 3)` without creating an object of the class.
Static Block:
A static block is a block of code enclosed in curly braces `{
}
` and preceded by the `static` keyword. It is used to initialize static variables or perform any necessary setup tasks before the class is used. The static block is executed only once when the class is loaded into memory.
Example
public static final int MAX_CONNECTIONS;
static {
// Initialization code MAX_CONNECTIONS = 10;
}
}
public class Main {
public static void main(String[] args) {
System.out.println("Max Connections: " + Config.MAX_CONNECTIONS);
}
}
In this example, the class `Config` has a static block that initializes the static variable `MAX_CONNECTIONS` to a value of 10. The static block is executed when the class is loaded, and we can access the initialized value using `Config.MAX_CONNECTIONS`.
The `static` keyword provides a way to define class-level members that are shared across instances and can be accessed without creating objects. It allows for efficient memory usage and enables the use of utility methods or constants without the need for object instantiation. However, it's important to use static members carefully and consider their implications in terms of shared state and thread safety.
this keyword
Referencing Instance Variables:
Invoking Another Constructor:
Returning the Current Object:
In Java, the `this` keyword is a reference to the current instance of a class. It is used within an instance method or constructor to refer to the current object on which the method or constructor is being invoked. The `this` keyword is primarily used to differentiate between instance variables and parameters or local variables with the same name.
The `this` keyword can be used to refer to instance variables of the current object. It is particularly useful when the instance variables have the same name as method parameters or local variables.
Example
private String name;
public Person(String name) {
this.name = name;
}
public void displayInfo() {
System.out.println("Name: " + this.name);
}
}
public class Main {
public static void main(String[] args) {
Person person = new Person("John");
person.displayInfo();
}
}
In this example, the `this.name` within the `displayInfo()` method refers to the `name` instance variable of the current `Person` object. It helps differentiate between the local variable `name` and the instance variable `name`.
The `this` keyword can be used to invoke another constructor of the same class. This is known as constructor chaining. It allows one constructor to call another constructor within the same class.
Example
private int width;
private int height;
public Rectangle() {
this(0, 0);
// calling the parameterized constructor using 'this' }
public Rectangle(int width, int height) {
this.width = width;
this.height = height;
}
}
public class Main {
public static void main(String[] args) {
Rectangle rectangle = new Rectangle();
System.out.println("Width: " + rectangle.width + ", Height: " + rectangle.height);
}
}
In this example, the no-argument constructor `Rectangle()` calls the parameterized constructor `Rectangle(int width, int height)` using `this(0, 0)`. It allows the code to reuse the initialization logic defined in the parameterized constructor.
The `this` keyword can be used to return the current object from an instance method or constructor. It is useful when you want to return the object itself for method chaining or other purposes.
Example
private int result;
public Calculator add(int number) {
this.result += number;
return this;
// returning the current object }
public int getResult() {
return this.result;
}
}
public class Main {
public static void main(String[] args) {
Calculator calculator = new Calculator();
int sum = calculator.add(5).add(3).add(2).getResult();
System.out.println("Sum: " + sum);
}
}
In this example, the `add()` method of the `Calculator` class returns the current object `this` to enable method chaining. It allows consecutive method calls on the same object and enhances the readability of the code.
The `this` keyword helps in distinguishing between instance variables and other variables, invoking constructors, and returning the current object. It plays a crucial role in Java's object-oriented programming paradigm and is widely used to ensure proper referencing and behavior within classes and objects.
Java Inheritance
Superclass and Subclass:
- Superclass (Parent Class): It is the class that is being extended or inherited from.
- Subclass (Child Class): It is the class that inherits the properties and methods from the superclass.
Inheriting Members:
- Inheritance allows the subclass to inherit the non-private members (fields and methods) of the superclass.
- The subclass can access and use these inherited members directly, as if they were defined within the subclass itself.
Access Modifiers:
- Inherited members are subject to the same access modifiers (public, protected, default, private) as defined in the superclass.
- The access modifiers control the visibility and accessibility of inherited members in the subclass.
Overriding:
- The subclass can override the inherited methods of the superclass to provide its own implementation.
- Method overriding allows the subclass to redefine the behavior of the superclass method with the same name and signature.
Single Inheritance:
Multilevel Inheritance:
Hierarchical Inheritance:
In Java, inheritance is a fundamental concept of object-oriented programming that allows classes to inherit properties and behaviors from other classes. It enables code reuse, promotes modularity, and facilitates the creation of hierarchical class structures. Inheritance is achieved through the `extends` keyword, where a subclass (child class) inherits the members of a superclass (parent class).
Here are some important points to understand about Java inheritance:
Now let's see an example to demonstrate Java inheritance:
Example
protected String name;
public Animal(String name) {
this.name = name;
}
public void makeSound() {
System.out.println("The animal makes a sound.");
}
}
// Subclass class Dog extends Animal {
private String breed;
public Dog(String name, String breed) {
super(name);
// invoking superclass constructor this.breed = breed;
}
public void makeSound() {
System.out.println("The dog barks.");
}
public void displayInfo() {
System.out.println("Name: " + name);
System.out.println("Breed: " + breed);
}
}
// Main class public class Main {
public static void main(String[] args) {
Dog dog = new Dog("Buddy", "Labrador");
dog.displayInfo();
dog.makeSound();
}
}
In this example, we have a superclass `Animal` and a subclass `Dog`. The `Animal` class has a `name` field and a `makeSound()` method. The `Dog` class extends the `Animal` class and adds a `breed` field, overrides the `makeSound()` method, and defines its own method `displayInfo()`.
In the `Main` class, we create an instance of the `Dog` class and demonstrate how the subclass inherits the `name` field from the superclass and uses its own `makeSound()` implementation. We also call the `displayInfo()` method to display the name and breed of the dog.
This example illustrates how the subclass `Dog` inherits the `name` field from the superclass `Animal` and overrides the `makeSound()` method to provide its own implementation. It showcases the concept of code reuse and polymorphism through inheritance in Java.
Type of Inheritance
In Java, there are several types of inheritances that can be used to establish relationships between classes. Let's explore the most commonly used types of inheritances along with example programs:
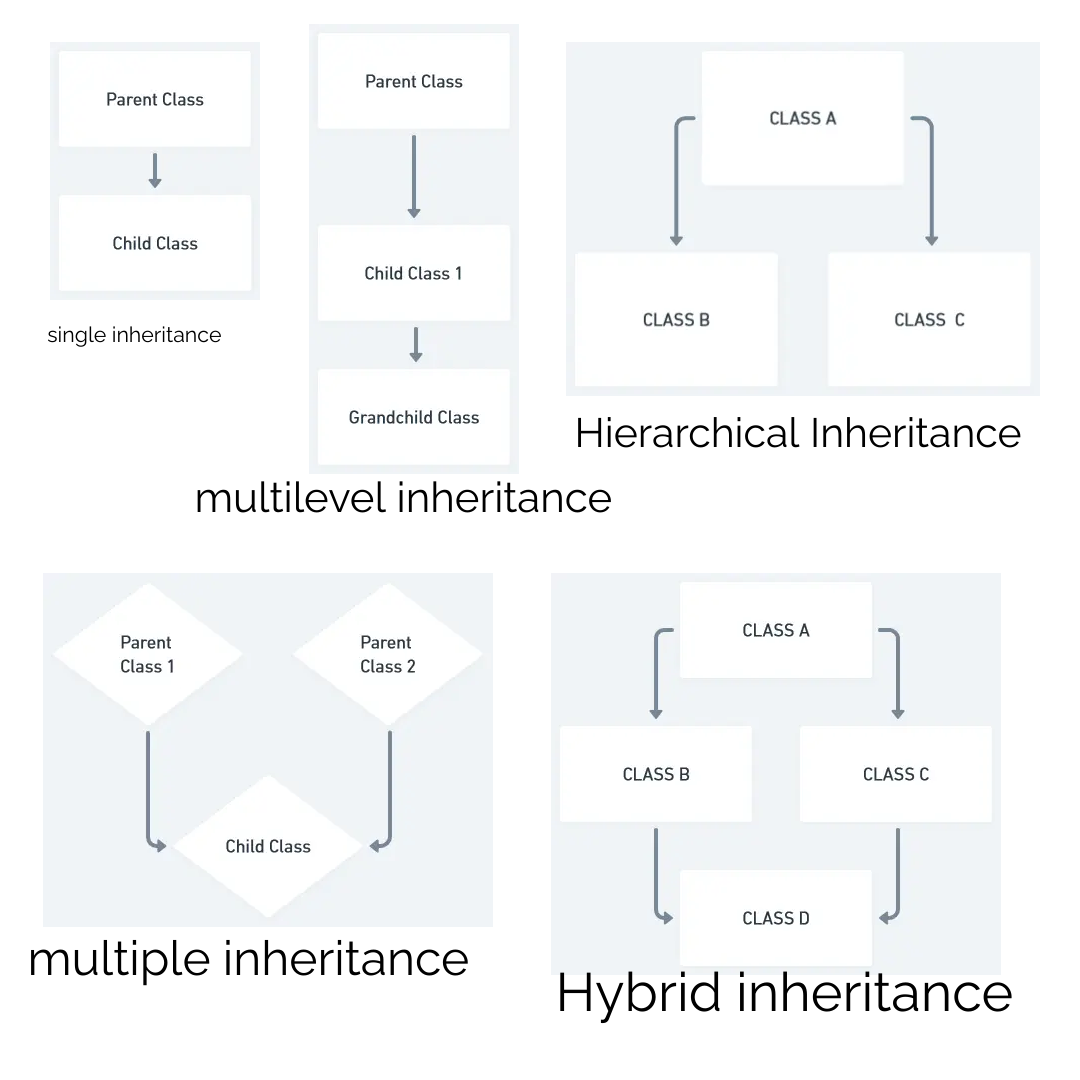
Single inheritance occurs when a class inherits from a single superclass.
Example
void drive() {
System.out.println("Driving a vehicle");
}
}
class Car extends Vehicle {
void accelerate() {
System.out.println("Accelerating the car");
}
}
public class Main {
public static void main(String[] args) {
Car car = new Car();
car.drive();
// Calling inherited method from the superclass car.accelerate();
// Calling method defined in the subclass }
}
In this example, the `Car` class extends the `Vehicle` class, inheriting the `drive()` method. The `Car` class also has its own method `accelerate()`. The program creates an instance of the `Car` class and demonstrates both the inherited method and the subclass-specific method.
Multilevel inheritance occurs when a class inherits from another class, which in turn inherits from another class.
Example
void eat() {
System.out.println("Eating...");
}
}
class Dog extends Animal {
void bark() {
System.out.println("Barking...");
}
}
class Bulldog extends Dog {
void run() {
System.out.println("Running...");
}
}
public class Main {
public static void main(String[] args) {
Bulldog bulldog = new Bulldog();
bulldog.eat();
// Calling inherited method from Animal class bulldog.bark();
// Calling inherited method from Dog class bulldog.run();
// Calling method defined in Bulldog class }
}
In this example, the `Bulldog` class extends the `Dog` class, which in turn extends the `Animal` class. The `Bulldog` class inherits both the `eat()` method from the `Animal` class and the `bark()` method from the `Dog` class. It also defines its own method `run()`. The program creates an instance of the `Bulldog` class and calls the inherited methods as well as the subclass-specific method.
Hierarchical inheritance occurs when multiple classes inherit from a single superclass.
Example
void draw() {
System.out.println("Drawing a shape");
}
}
class Circle extends Shape {
void draw() {
System.out.println("Drawing a circle");
}
}
class Rectangle extends Shape {
void draw() {
System.out.println("Drawing a rectangle");
}
}
public class Main {
public static void main(String[] args) {
Circle circle = new Circle();
circle.draw();
// Calling method defined in Circle class Rectangle rectangle = new Rectangle();
rectangle.draw();
// Calling method defined in Rectangle class }
}
In this example, both the `Circle` and `Rectangle` classes inherit from the `Shape` class. Each subclass defines its own `draw()` method, providing different implementations. The program creates instances of both the `Circle` and `Rectangle` classes and calls their respective `draw()` methods.
These are just a few examples of the types of inheritances in Java. Each type serves different purposes and can be used based on the specific requirements of the program.
Method Overloading
Method overloading in Java allows a class to have multiple methods with the same name but different parameters. It provides a way to create methods with similar functionality but different input parameters or data types. The Java compiler determines which method to execute based on the number, types, and order of the arguments passed during method invocation.
Example
// Method with two integer parameters int add(int a, int b) {
return a + b;
}
// Method with three integer parameters int add(int a, int b, int c) {
return a + b + c;
}
// Method with two double parameters double add(double a, double b) {
return a + b;
}
}
public class Main {
public static void main(String[] args) {
MathUtils math = new MathUtils();
int sum1 = math.add(5, 10);
System.out.println("Sum 1: " + sum1);
// Output: Sum 1: 15 int sum2 = math.add(2, 4, 6);
System.out.println("Sum 2: " + sum2);
// Output: Sum 2: 12 double sum3 = math.add(2.5, 3.7);
System.out.println("Sum 3: " + sum3);
// Output: Sum 3: 6.2 }
}
In the above example, the `MathUtils` class has three overloaded `add()` methods. The first method takes two integer parameters and returns the sum of the integers. The second method takes three integer parameters and returns the sum of the integers. The third method takes two double parameters and returns the sum of the doubles.
The `main()` method creates an instance of `MathUtils` and calls each overloaded method with different arguments. The appropriate method is invoked based on the number and types of arguments passed.
Method overloading provides flexibility and convenience by allowing developers to use the same method name for similar operations. It enhances code readability and eliminates the need to create multiple methods with different names for similar functionality.
Method Overriding
Method overriding in Java occurs when a subclass provides a specific implementation for a method that is already defined in its superclass. The method in the subclass should have the same method signature (i.e., the same method name, return type, and parameter list) as the method in the superclass.
Example
void sound() {
System.out.println("Animal makes a sound");
}
}
class Dog extends Animal {
@Override void sound() {
System.out.println("Dog barks");
}
}
class Cat extends Animal {
@Override void sound() {
System.out.println("Cat meows");
}
}
public class Main {
public static void main(String[] args) {
Animal animal1 = new Animal();
Animal animal2 = new Dog();
Animal animal3 = new Cat();
animal1.sound();
// Output: Animal makes a sound animal2.sound();
// Output: Dog barks animal3.sound();
// Output: Cat meows }
}
In the above example, the Animal class has a method named sound(), and both the Dog and Cat classes extend the Animal class. Both subclasses override the sound() method with their own specific implementations.
During runtime, Java determines which version of the sound() method to execute based on the actual type of the object (dynamic binding). When animal1.sound() is called, the sound() method from the Animal class is invoked. When animal2.sound() is called, the overridden sound() method from the Dog class is invoked. Similarly, animal3.sound() invokes the overridden sound() method from the Cat class.
Method overriding allows subclasses to provide their own specialized implementation for a particular method, which enables polymorphic behavior in Java. It allows you to work with objects of different classes through a common interface (e.g., the Animal reference in the example), without knowing their specific types at compile-time.
super keyword
In Java, the `super` keyword is used to refer to the immediate parent class of a subclass. It allows the subclass to access and call methods, fields, or constructors from its superclass. The `super` keyword is often used in cases of method overriding and when there is a name conflict between a subclass and superclass member.
Here are some examples of how the `super` keyword is used:
Accessing Superclass Method:
void sound() {
System.out.println("Animal makes a sound");
}
}
class Dog extends Animal {
@Override void sound() {
super.sound();
// Calls the sound() method of the superclass (Animal) System.out.println("Dog barks");
}
}
public class Main {
public static void main(String[] args) {
Dog dog = new Dog();
dog.sound();
}
}
Accessing Superclass Field:
String type = "Animal";
}
class Dog extends Animal {
String type = "Dog";
void displayType() {
System.out.println(type);
// Refers to the type field of Dog class System.out.println(super.type);
// Refers to the type field of Animal class }
}
public class Main {
public static void main(String[] args) {
Dog dog = new Dog();
dog.displayType();
}
}
Invoking Superclass Constructor:
String type;
Animal(String type) {
this.type = type;
}
}
class Dog extends Animal {
String breed;
Dog(String type, String breed) {
super(type);
// Invokes the constructor of the superclass (Animal) this.breed = breed;
}
void displayInfo() {
System.out.println("Type: " + type);
System.out.println("Breed: " + breed);
}
}
public class Main {
public static void main(String[] args) {
Dog dog = new Dog("Dog", "Labrador");
dog.displayInfo();
}
}
In this example, the `super(type)` call in the `Dog` constructor invokes the constructor of the superclass `Animal`. This allows us to initialize the `type` field of the `Animal` class using the provided argument. The `breed` field is initialized in the `Dog` constructor itself.
The `super` keyword is essential in Java inheritance when you want to access the members of the superclass from the subclass or when you need to explicitly call a constructor in the superclass.
final keyword
Final Variables:
Final Methods:
Final Classes:
Final Arguments:
In Java, the `final` keyword is used to denote that a variable, method, or class cannot be changed or overridden once it has been initialized or defined. It provides a way to create constants, prevent method overriding, and prohibit inheritance of a class.
When a variable is declared as `final`, its value cannot be changed after its initialization.
Example
public static void main(String[] args) {
final int x = 10;
// x = 20;
// Error: Cannot assign a value to a final variable System.out.println(x);
}
}
When a method is declared as `final` in a class, it cannot be overridden in any subclass.
Example
final void display() {
System.out.println("This is a final method.");
}
}
class Child extends Parent {
// Attempt to override the final method will result in a compilation error // void display() {
}
}
public class Main {
public static void main(String[] args) {
Parent parent = new Parent();
parent.display();
}
}
When a class is declared as `final`, it cannot be subclassed, meaning no other class can inherit from it.
Example
void display() {
System.out.println("This is a final class.");
}
}
// Attempt to inherit from a final class will result in a compilation error // class SubClass extends FinalClass {
}
public class Main {
public static void main(String[] args) {
FinalClass obj = new FinalClass();
obj.display();
}
}
When a parameter is declared as `final` in a method, its value cannot be changed within the method.
Example
void display(final int x) {
// x = 20;
// Error: Cannot assign a value to final variable 'x' System.out.println(x);
}
public static void main(String[] args) {
Main obj = new Main();
obj.display(10);
}
}
The `final` keyword ensures that the value of a variable or the behavior of a method or class remains constant throughout the program's execution. It adds predictability, safety, and optimization opportunities to the code and is widely used in Java programming.
Runtime Polymorphism
Runtime Polymorphism, also known as Dynamic Polymorphism, is a feature in object-oriented programming that allows a subclass to provide a specific implementation of a method that is already defined in its superclass. The decision on which method implementation to invoke is made during runtime based on the actual type of the object.
This concept is achieved through method overriding, where a subclass provides its own implementation of a method that is already present in its superclass. During runtime, the Java Virtual Machine (JVM) identifies the actual type of the object and calls the appropriate method accordingly.
Here's an example to illustrate Runtime Polymorphism:
Example
void draw() {
System.out.println("Drawing a shape");
}
}
// Subclass Circle class Circle extends Shape {
@Override void draw() {
System.out.println("Drawing a circle");
}
}
// Subclass Square class Square extends Shape {
@Override void draw() {
System.out.println("Drawing a square");
}
}
public class Main {
public static void main(String[] args) {
Shape shape1 = new Circle();
Shape shape2 = new Square();
// Runtime Polymorphism: The appropriate draw() method is called based on the actual object type shape1.draw();
// Output: Drawing a circle shape2.draw();
// Output: Drawing a square }
}
In this example, we have a superclass `Shape` with a method `draw()`, and two subclasses `Circle` and `Square`, each of which overrides the `draw()` method to provide its own implementation. During runtime, we create objects of the subclass type and assign them to a reference of the superclass. When we call the `draw()` method on these references, the JVM determines the actual type of the object and invokes the corresponding method based on the actual object type.
Runtime Polymorphism is a powerful concept that allows us to write flexible and extensible code, making it easier to handle a diverse set of objects in an object-oriented system. It is a fundamental aspect of inheritance and object-oriented design.
Dynamic Binding
Dynamic Binding, also known as Late Binding or Run-Time Binding, is a mechanism in object-oriented programming languages where the method call is resolved at runtime rather than compile time. It enables the selection of the appropriate method implementation based on the actual type of the object, allowing for greater flexibility and polymorphism.
Dynamic Binding is closely related to Runtime Polymorphism and is achieved through method overriding. When a method is overridden in a subclass, the actual method to be executed is determined during runtime based on the type of the object being referenced, rather than the type of the reference variable.
Here's an example to illustrate Dynamic Binding:
Example
void sound() {
System.out.println("Animal makes a sound");
}
}
// Subclass Dog class Dog extends Animal {
@Override void sound() {
System.out.println("Dog barks");
}
}
// Subclass Cat class Cat extends Animal {
@Override void sound() {
System.out.println("Cat meows");
}
}
public class Main {
public static void main(String[] args) {
Animal animal1 = new Dog();
Animal animal2 = new Cat();
// Dynamic Binding: The appropriate sound() method is called based on the actual object type animal1.sound();
// Output: Dog barks animal2.sound();
// Output: Cat meows }
}
In this example, we have a superclass `Animal` with a method `sound()`, and two subclasses `Dog` and `Cat`, each of which overrides the `sound()` method to provide its own implementation. During runtime, we create objects of the subclass type and assign them to a reference of the superclass. When we call the `sound()` method on these references, the JVM determines the actual type of the object and invokes the corresponding method based on the actual object type.
Dynamic Binding is a crucial feature in object-oriented languages as it enables polymorphism and allows code to be more flexible and adaptable to different object types. It is an essential aspect of object-oriented programming and inheritance.
instanceof operator
The `instanceof` operator in Java is used to check whether an object is an instance of a particular class or a subclass. It returns a boolean value (`true` or `false`) based on the evaluation. The `instanceof` operator helps in performing type checking and allows you to determine if an object is compatible with a specific class type before performing certain operations on it.
Syntax:
Where `object` is the reference to the object you want to check, and `class` is the name of the class or interface you want to test against.
Example
}
class Dog extends Animal {
}
class Cat extends Animal {
}
public class Main {
public static void main(String[] args) {
Animal animal1 = new Dog();
Animal animal2 = new Cat();
Animal animal3 = new Animal();
System.out.println(animal1 instanceof Animal);
// Output: true System.out.println(animal1 instanceof Dog);
// Output: true System.out.println(animal1 instanceof Cat);
// Output: false System.out.println(animal2 instanceof Animal);
// Output: true System.out.println(animal2 instanceof Dog);
// Output: false System.out.println(animal2 instanceof Cat);
// Output: true System.out.println(animal3 instanceof Animal);
// Output: true System.out.println(animal3 instanceof Dog);
// Output: false System.out.println(animal3 instanceof Cat);
// Output: false }
}
In this example, we have a superclass `Animal` and two subclasses `Dog` and `Cat`. We create objects of these subclasses and assign them to references of the superclass `Animal`. Then, we use the `instanceof` operator to check the type compatibility of these objects against the `Animal`, `Dog`, and `Cat` classes. The operator returns `true` if the object is an instance of the specified class or any of its subclasses;
otherwise, it returns `false`.
The `instanceof` operator is particularly useful when you want to perform different actions based on the type of an object at runtime, or when you need to handle objects of different classes in a polymorphic manner. However, it is essential to use `instanceof` judiciously, as excessive use may indicate a design issue in your code and can potentially lead to less maintainable code.
Abstract class
- 1. You cannot create an instance of an abstract class using the `new` keyword because it cannot be instantiated directly.
- 2. Abstract classes can have constructors, instance variables, static methods, and non-abstract methods with implementations, just like regular classes.
- 3. If a class contains at least one abstract method, it must be declared as an abstract class using the `abstract` keyword.
- 4. Concrete (implemented) methods can coexist with abstract methods within the same abstract class.
In Java, an abstract class is a class that cannot be instantiated on its own but can serve as a blueprint for other classes. It is designed to be a base class for other classes and contains abstract methods (methods without a body) that must be implemented by its subclasses. An abstract class may also have concrete (implemented) methods along with abstract methods.
To define an abstract class, you use the `abstract` keyword in the class declaration. Here's the syntax:
syntax:
// Abstract methods (no method body) abstract void abstractMethod1();
abstract void abstractMethod2();
// Concrete method with an implementation void concreteMethod() {
// Method implementation }
}
Key points about abstract classes:
Here's an example of an abstract class with abstract and concrete methods:
Example
String color;
// Abstract method (no implementation) abstract double getArea();
// Concrete method with implementation void setColor(String color) {
this.color = color;
}
}
class Circle extends Shape {
double radius;
Circle(double radius) {
this.radius = radius;
}
// Implementing the abstract method @Override double getArea() {
return Math.PI * radius * radius;
}
}
class Rectangle extends Shape {
double width;
double height;
Rectangle(double width, double height) {
this.width = width;
this.height = height;
}
// Implementing the abstract method @Override double getArea() {
return width * height;
}
}
public class Main {
public static void main(String[] args) {
Shape circle = new Circle(5.0);
Shape rectangle = new Rectangle(4.0, 3.0);
circle.setColor("Red");
rectangle.setColor("Blue");
System.out.println("Circle Area: " + circle.getArea());
System.out.println("Rectangle Area: " + rectangle.getArea());
}
}
In this example, we have an abstract class `Shape` with an abstract method `getArea()` and a concrete method `setColor()`. The `Circle` and `Rectangle` classes extend the `Shape` abstract class and provide implementations for the `getArea()` method. We create objects of the `Circle` and `Rectangle` classes and call their methods to calculate their areas.
Abstract classes are useful when you want to define a common interface for a group of related classes and enforce the implementation of certain methods across those classes. They are a fundamental concept in Java's object-oriented programming paradigm and facilitate code reusability and maintainability.
Interface
- 1. An interface cannot be instantiated directly using the `new` keyword, and it does not contain any instance variables. It only defines method signatures (with no method bodies) and constants.
- 2. All methods in an interface are implicitly `public` and `abstract`, meaning they have no implementation and must be overridden by the implementing classes.
- 3. Since Java 8, interfaces can have default methods, which provide a default implementation for a method. These methods are marked with the `default` keyword and can be overridden by implementing classes if needed.
- 4. Java 8 also introduced static methods in interfaces, which are declared using the `static` keyword. These methods are associated with the interface itself and not with any specific instance of the implementing class.
- 5. A class can implement multiple interfaces, allowing it to inherit and implement behavior from multiple sources.
In Java, an interface is a reference type that defines a contract of methods that implementing classes must adhere to. It acts as a blueprint for classes that implement it, ensuring that those classes provide specific functionality. An interface is declared using the `interface` keyword and can contain abstract methods, default methods, and static methods.
Key points about interfaces:
Here's the syntax for declaring an interface in Java:
syntax
// Abstract method (no implementation) void abstractMethod1();
// Abstract method with parameters void abstractMethod2(int param);
// Default method with implementation default void defaultMethod() {
// Default implementation }
// Static method with implementation static void staticMethod() {
// Static method implementation }
}
Let's see an example of using an interface:
Example
void print();
}
class Book implements Printable {
private String title;
public Book(String title) {
this.title = title;
}
@Override public void print() {
System.out.println("Printing book: " + title);
}
}
class Document implements Printable {
private String name;
public Document(String name) {
this.name = name;
}
@Override public void print() {
System.out.println("Printing document: " + name);
}
}
public class Main {
public static void main(String[] args) {
Printable book = new Book("Java Programming");
Printable document = new Document("Java Tutorial");
book.print();
// Output: Printing book: Java Programming document.print();
// Output: Printing document: Java Tutorial }
}
In this example, we have an interface `Printable` with one abstract method `print()`. The `Book` and `Document` classes implement the `Printable` interface and provide their own implementations for the `print()` method. We create objects of the `Book` and `Document` classes and call the `print()` method on them, which invokes their respective implementations.
Interfaces are a powerful feature in Java and are used extensively to achieve abstraction, define contracts, and enable polymorphism in object-oriented programming. They provide a way to define common behavior across different classes without specifying how that behavior is implemented, making code more flexible and maintainable.
Abstract vs Interface
Definition:
Abstract Class:
An abstract class is a class that cannot be instantiated on its own and may contain both abstract and concrete (implemented) methods. It is declared using the `abstract` keyword.Interface:
An interface is a reference type that defines a contract of abstract methods (with no method bodies) and constants. All methods in an interface are implicitly `public` and `abstract`.Multiple Inheritance:
Abstract Class:
A class can extend only one abstract class due to the limitation of single inheritance in Java.Interface:
A class can implement multiple interfaces, allowing it to inherit behavior from multiple sources. This enables multiple inheritance of types in Java.Constructors:
Abstract Class:
An abstract class can have constructors that are called when an instance of a concrete subclass is created.Interface:
An interface cannot have constructors because interfaces cannot be instantiated directly.Method Implementation:
Abstract Class:
An abstract class can have abstract methods (without implementation) and concrete methods (with implementation). Subclasses extending an abstract class must provide implementations for its abstract methods.Interface:
All methods in an interface are implicitly abstract. In Java 8 and later versions, interfaces can have default methods (with implementation) and static methods. Default methods provide a default implementation that can be overridden by implementing classes.Accessibility:
Abstract Class:
Abstract classes can have access specifiers (e.g., `public`, `protected`, `private`) for their methods, allowing more control over visibility and access.Interface:
All methods in an interface are implicitly `public`, and access specifiers are not allowed. Fields in an interface are implicitly `public`, `static`, and `final`.- Use an abstract class when you want to provide a common base implementation for related classes and when you want to share code among subclasses.
- Use an interface when you want to define a contract for unrelated classes to adhere to and when you want to enable multiple inheritance of types.
Abstract classes and interfaces are two fundamental concepts in Java that enable abstraction and define contracts for implementing classes. While they serve similar purposes, they have some key differences:
Which to Use?
In summary, abstract classes are more suitable for creating a common base class with some shared implementation, while interfaces are more appropriate for defining contracts for unrelated classes to adhere to, allowing them to be more flexible in their implementations. Both abstract classes and interfaces play crucial roles in achieving abstraction and polymorphism in Java programming. The choice between the two depends on the specific design requirements and the relationship between the classes you are defining.
Package
1. Import the Class:
You can use the `import` statement to import the class into your code. This way, you can use the class name directly without specifying the full package path every time you reference it.2. Fully Qualified Name:
Alternatively, you can use the fully qualified name of the class (including the package name) every time you use it.
In Java, a package is a way to organize and group related classes and interfaces together. It provides a mechanism for creating a namespace and avoiding naming conflicts between classes with similar names. Packages help in modularizing code, improving code maintainability, and enhancing code reusability.
To create a package in Java, you can use the `package` keyword followed by the package name at the top of your Java source file. The package declaration should be the first non-comment line in the file. For example:
Example
The package name convention follows the reverse domain name notation, meaning you start with your domain name in reverse, followed by your project or application name. This helps ensure unique package names even when working on different projects.
Once you have defined a package, you can place your classes and interfaces within that package. To do this, you must include the package name in the class/interface declaration. For example:
Example
public class MyClass {
// Class implementation here }
To use a class from another package in your code, you have a few options:
Example
import com.example.otherpackage.OtherClass;
public class MyClass {
public static void main(String[] args) {
OtherClass obj = new OtherClass();
// Use the OtherClass object here }
}
Example
public class MyClass {
public static void main(String[] args) {
com.example.otherpackage.OtherClass obj = new com.example.otherpackage.OtherClass();
// Use the OtherClass object here }
}
It is a good practice to organize your code into packages based on functionality or module to keep it structured and manageable.
Packages can also be used to control access levels to classes and interfaces. If no package declaration is specified, the class is considered to be part of the default package (with no name), which has more relaxed access control.
In summary, packages in Java provide a way to organize classes and interfaces, control access levels, and avoid naming conflicts. They contribute to a well-structured and modular codebase, making it easier to develop and maintain Java applications.
Access modifiers
1. `public`:
The `public` access modifier makes a class, method, variable, or constructor accessible from any other class in the program, including classes from other packages.2. `private`:
The `private` access modifier restricts the visibility of a class member (method, variable, or nested class) to only within the same class where it is declared. It cannot be accessed from outside the class, including subclasses.3. `protected`:
The `protected` access modifier allows the member to be accessed within the same class, subclasses (inheritance), and classes within the same package.4. `default` (package-private):
If no access modifier is specified (i.e., no `public`, `private`, or `protected` keyword), it is considered to have default access, also known as package-private. It allows access within the same package but restricts access from outside the package.
Access modifiers in Java are keywords used to define the visibility or accessibility of classes, methods, variables, and constructors within a Java program. They control how different parts of the program can be accessed or interacted with by other classes or code outside their own scope. Java has four main access modifiers:
Here's an example demonstrating the use of access modifiers:
Example
public int publicVar = 10;
public void publicMethod() {
System.out.println("This is a public method.");
}
}
// Class with default access modifier (package-private) class DefaultExample {
int defaultVar = 20;
void defaultMethod() {
System.out.println("This is a default method.");
}
}
// Class with private access modifier class PrivateExample {
private int privateVar = 30;
private void privateMethod() {
System.out.println("This is a private method.");
}
}
// Class with protected access modifier class ProtectedExample {
protected int protectedVar = 40;
protected void protectedMethod() {
System.out.println("This is a protected method.");
}
}
public class Main {
public static void main(String[] args) {
PublicExample publicObj = new PublicExample();
System.out.println("Public variable: " + publicObj.publicVar);
publicObj.publicMethod();
DefaultExample defaultObj = new DefaultExample();
System.out.println("Default variable: " + defaultObj.defaultVar);
defaultObj.defaultMethod();
PrivateExample privateObj = new PrivateExample();
// Error: privateVar and privateMethod() not accessible here. ProtectedExample protectedObj = new ProtectedExample();
System.out.println("Protected variable: " + protectedObj.protectedVar);
protectedObj.protectedMethod();
}
}
In this example, the `PublicExample` class and its members are accessible from anywhere, including outside the package. The `DefaultExample` class and its members have package-private access, so they are accessible only within the same package. The `PrivateExample` class and its members are accessible only within the class itself. The `ProtectedExample` class and its members are accessible within the same package and from subclasses, even if they are in different packages.
Encapsulation
- 1.
Data Hiding:
The internal data of an object is hidden from external classes, preventing direct access and unauthorized modifications. This enhances security and helps maintain data integrity. - 2.
Abstraction:
External classes only need to interact with the public methods, abstracting the complexity of the internal implementation. This simplifies the usage of the object. - 3.
Modularity:
The internal implementation of an object is isolated from the rest of the code, making it easier to change or update without affecting other parts of the program. - 4.
Code Organization:
Encapsulation helps in organizing the code into self-contained and reusable classes, improving code maintainability.
Encapsulation is one of the four fundamental OOP (Object-Oriented Programming) concepts and is used to restrict access to the internal details of an object. It is achieved by bundling the data (attributes) and methods (behaviors) that operate on the data within a single unit called a class. In encapsulation, the internal state of an object is hidden from the outside world, and access to it is only allowed through public methods, which are also known as getters and setters.
Encapsulation provides several benefits:
Here's an example demonstrating encapsulation:
Example
private int data;
// Private data member // Public getter method to access data public int getData() {
return data;
}
// Public setter method to modify data public void setData(int value) {
data = value;
}
}
public class Main {
public static void main(String[] args) {
EncapsulatedClass obj = new EncapsulatedClass();
// Accessing and setting data using public methods (getters and setters) obj.setData(42);
int value = obj.getData();
System.out.println("Data value: " + value);
}
}
In this example, the `EncapsulatedClass` has a private data member `data`, which cannot be accessed directly from outside the class. Instead, the data is accessed and modified using the public methods `getData()` and `setData()`. This way, the internal state of the object is encapsulated and protected from external interference.
Let's consider a real-life example of encapsulation using a bank account class.
Example
private String accountNumber;
private double balance;
private String accountHolderName;
// Constructor public BankAccount(String accountNumber, double balance, String accountHolderName) {
this.accountNumber = accountNumber;
this.balance = balance;
this.accountHolderName = accountHolderName;
}
// Public method to deposit money public void deposit(double amount) {
balance += amount;
System.out.println(amount + " deposited. New balance: " + balance);
}
// Public method to withdraw money public void withdraw(double amount) {
if (amount <= balance) {
balance -= amount;
System.out.println(amount + " withdrawn. New balance: " + balance);
}
else {
System.out.println("Insufficient balance.");
}
}
// Public method to get account information public void getAccountInfo() {
System.out.println("Account Number: " + accountNumber);
System.out.println("Account Holder: " + accountHolderName);
System.out.println("Balance: " + balance);
}
}
public class Main {
public static void main(String[] args) {
BankAccount account = new BankAccount("1234567890", 1000.0, "John Doe");
account.deposit(500.0);
account.withdraw(200.0);
account.getAccountInfo();
}
}
In this example, the `BankAccount` class represents a bank account with three private data members: `accountNumber`, `balance`, and `accountHolderName`. These data members are encapsulated and cannot be accessed directly from outside the class.
Instead, we have public methods like `deposit()`, `withdraw()`, and `getAccountInfo()` that provide controlled access to these data members. The `deposit()` and `withdraw()` methods allow users to interact with the account and modify the `balance`, but they ensure that the balance remains within the expected range (non-negative). The `getAccountInfo()` method allows users to get information about the account in a controlled manner.
By encapsulating the internal details of the `BankAccount` class, we achieve data hiding and protect the integrity of the object. Users of the `BankAccount` class can only access the account data through the defined public methods, ensuring that the account is used safely and correctly.
Array
1. Static Initialization:
In this method, you specify the values of the elements at the time of array creation. The size of the array is determined by the number of elements you provide.2. Dynamic Initialization:
In this method, you create an array and then assign values to its elements one by one.1. Tic-Tac-Toe Board:
A Tic-Tac-Toe board is a 3x3 grid where players place their marks (usually 'X' and 'O') in the cells. We can represent the board using a 2D array where each cell holds the player's mark or is left empty.Example
char[][] ticTacToeBoard = {
{
' ', ' ', ' '}
, {
' ', ' ', ' '}
, {
' ', ' ', ' '}
}
;
2. Spreadsheet:
In a spreadsheet application, data is organized in rows and columns. Each cell in the spreadsheet can hold a value, and the entire data can be represented using a 2D array.Example
int[][] spreadsheetData = {
{
10, 20, 30}
, {
40, 50, 60}
, {
70, 80, 90}
}
;
3. Image Representation:
In image processing, images can be represented as 2D arrays of pixels. Each pixel holds information about its color or intensity value.Example
int[][] imagePixels = {
{
255, 0, 0}
, // Red pixel {
0, 255, 0}
, // Green pixel {
0, 0, 255}
// Blue pixel }
;
4. Classroom Seating Arrangement:
In a classroom, seating arrangements can be represented using a 2D array where each element represents a seat and can store information about the student occupying the seat.Example
String[][] classroomSeating = {
{
"Alice", "Bob", "Carol"}
, {
"David", "Eva", "Frank"}
, {
"Grace", "Hannah", "Ivan"}
}
;
These examples illustrate how 2D arrays can be used to represent and manipulate data in various real-life scenarios. They provide a structured way to organize and access data in a grid-like fashion. In Java, you can work with 2D arrays using nested loops to traverse through rows and columns, making it easier to perform operations on the data.
Let's create an example program to represent the Tic-Tac-Toe board using a 2D array and allow two players to play the game.
Tic-Tac-Toe Example
import java.util.Scanner;
public class TicTacToeGame {
private static final int BOARD_SIZE = 3;
private static char[][] board = new char[BOARD_SIZE][BOARD_SIZE];
private static char currentPlayer = 'X';
public static void main(String[] args) {
initializeBoard();
printBoard();
while (true) {
int row, col;
do {
System.out.println("Player " + currentPlayer + ", enter row (1-3) and column (1-3): ");
row = getPlayerInput() - 1;
col = getPlayerInput() - 1;
}
while (!isValidMove(row, col));
board[row][col] = currentPlayer;
printBoard();
if (checkWin()) {
System.out.println("Player " + currentPlayer + " wins!");
break;
}
if (isBoardFull()) {
System.out.println("It's a tie!");
break;
}
currentPlayer = (currentPlayer == 'X') ? 'O' : 'X';
}
}
private static void initializeBoard() {
for (int i = 0;
i < BOARD_SIZE;
i++) {
for (int j = 0;
j < BOARD_SIZE;
j++) {
board[i][j] = ' ';
}
}
}
private static void printBoard() {
System.out.println("-------------");
for (int i = 0;
i < BOARD_SIZE;
i++) {
for (int j = 0;
j < BOARD_SIZE;
j++) {
System.out.print("| " + board[i][j] + " ");
}
System.out.println("|");
System.out.println("-------------");
}
}
private static int getPlayerInput() {
Scanner scanner = new Scanner(System.in);
while (!scanner.hasNextInt()) {
System.out.println("Invalid input. Please enter a number.");
scanner.next();
}
return scanner.nextInt();
}
private static boolean isValidMove(int row, int col) {
if (row < 0 || row >= BOARD_SIZE || col < 0 || col >= BOARD_SIZE) {
System.out.println("Invalid move. Row and column must be between 1 and 3.");
return false;
}
if (board[row][col] != ' ') {
System.out.println("Invalid move. Cell is already taken.");
return false;
}
return true;
}
private static boolean checkWin() {
return checkRows() || checkColumns() || checkDiagonals();
}
private static boolean checkRows() {
for (int i = 0;
i < BOARD_SIZE;
i++) {
if (board[i][0] != ' ' && board[i][0] == board[i][1] && board[i][0] == board[i][2]) {
return true;
}
}
return false;
}
private static boolean checkColumns() {
for (int i = 0;
i < BOARD_SIZE;
i++) {
if (board[0][i] != ' ' && board[0][i] == board[1][i] && board[0][i] == board[2][i]) {
return true;
}
}
return false;
}
private static boolean checkDiagonals() {
if (board[0][0] != ' ' && board[0][0] == board[1][1] && board[0][0] == board[2][2]) {
return true;
}
if (board[0][2] != ' ' && board[0][2] == board[1][1] && board[0][2] == board[2][0]) {
return true;
}
return false;
}
private static boolean isBoardFull() {
for (int i = 0;
i < BOARD_SIZE;
i++) {
for (int j = 0;
j < BOARD_SIZE;
j++) {
if (board[i][j] == ' ') {
return false;
}
}
}
return true;
}
}
This program allows two players to play Tic-Tac-Toe on the console. Players take turns entering the row and column of the cell they want to mark with their symbol ('X' or 'O'). The program checks for a win or a tie after each move and prints the updated board until the game is over.
In Java, an array is a data structure that allows you to store multiple values of the same data type in a single variable. It provides a convenient way to work with collections of elements, such as integers, strings, or objects. Arrays in Java have a fixed size, meaning you need to specify the size of the array when it is created, and this size cannot be changed afterward.
To create an array in Java, you need to declare the array variable and specify the data type of the elements it will hold. Here's the basic syntax to declare an array:
syntax
For example, to declare an array of integers:
syntax
Once the array is declared, you also need to initialize it before using it. There are two ways to initialize an array:
syntax
1, 2, 3, 4, 5}
;
Example
// Creates an array of size 5 numbers[0] = 1;
numbers[1] = 2;
numbers[2] = 3;
numbers[3] = 4;
numbers[4] = 5;
You can also access elements of the array using their index. The index starts from 0 for the first element, 1 for the second element, and so on. For example:
Example
1, 2, 3, 4, 5}
;
int firstElement = numbers[0];
// Accesses the first element (1) int thirdElement = numbers[2];
// Accesses the third element (3)
Arrays in Java are very useful for various operations, such as iteration, searching, and sorting. You can use loops (e.g., `for` or `foreach`) to traverse through the elements of an array and perform operations on them.
Example
1, 2, 3, 4, 5}
;
// Iterating through the array using for loop for (int i = 0;
i < numbers.length;
i++) {
System.out.print(numbers[i] + " ");
}
// Iterating through the array using foreach loop for (int num : numbers) {
System.out.print(num + " ");
}
Two-dimensional arrays, also known as 2D arrays, are arrays that store data in a grid-like format with rows and columns. Each element in a 2D array is identified by two indices: one for the row and one for the column.
Real-life examples of 2D arrays can be found in various applications. Let's look at some examples:
Object class
1. `toString()`:
This method returns a string representation of the object. By default, it returns the class name followed by the memory address of the object.2. `equals(Object obj)`:
This method is used to compare two objects for equality. By default, it checks if the two references are pointing to the same object in memory. However, it is recommended to override this method in user-defined classes to define a meaningful equality comparison.3. `hashCode()`:
This method returns a hash code value for the object. It is used in data structures like HashMap and HashSet to efficiently store and retrieve objects.4. `getClass()`:
This method returns the runtime class of the object, which is an instance of `java.lang.Class`. It is useful when you need to know the actual class of an object at runtime.5. `finalize()`:
This method is called by the garbage collector before reclaiming the memory occupied by the object. It can be overridden to perform cleanup tasks before the object is destroyed.6. `clone()`:
This method is used to create a copy of the object. However, it is recommended to use the `Cloneable` interface and override the `clone()` method properly in user-defined classes to support cloning.7. `notify()`, `notifyAll()`, and `wait()`:
These methods are used for inter-thread communication in Java's multi-threading environment.
In Java, the `Object` class is the root class of all classes. Every class in Java is either directly or indirectly derived from the `Object` class. It is provided by the Java API and contains several methods that are common to all objects in Java.
Here are some important points about the `Object` class:
Since every class in Java inherits from the `Object` class, these methods are available in all objects. However, some of these methods need to be overridden in user-defined classes to provide meaningful implementations based on the specific requirements of the class.
Here's a simple example to demonstrate the `toString()` and `equals()` methods:
Example
private String name;
private int age;
public Person(String name, int age) {
this.name = name;
this.age = age;
}
// Override the toString() method to provide a meaningful representation of the object. @Override public String toString() {
return "Person[name=" + name + ", age=" + age + "]";
}
// Override the equals() method to define equality based on name and age. @Override public boolean equals(Object obj) {
if (this == obj) {
return true;
}
if (obj == null || getClass() != obj.getClass()) {
return false;
}
Person other = (Person) obj;
return name.equals(other.name) && age == other.age;
}
}
public class ObjectClassExample {
public static void main(String[] args) {
Person person1 = new Person("John", 30);
Person person2 = new Person("John", 30);
System.out.println(person1);
// Output: Person[name=John, age=30] // Using equals() to compare two objects for equality. System.out.println(person1.equals(person2));
// Output: true }
}
In this example, we override the `toString()` method to provide a custom string representation of the `Person` object, and we override the `equals()` method to compare two `Person` objects based on their `name` and `age` properties.
Object Cloning
- 1. The `Cloneable` Interface: This is a marker interface in Java, which means it does not declare any methods. It is used to indicate that a class supports cloning and allows the use of the `clone()` method. If a class does not implement the `Cloneable` interface and the `clone()` method is called on an instance of that class, it will throw a `CloneNotSupportedException`.
- 2. The `clone()` Method: The `clone()` method is defined in the `Object` class and is protected. To enable object cloning for a class, you need to override the `clone()` method and make it public. The method returns a shallow copy of the object, which means the copy itself is a new object, but its internal references still point to the same objects as the original object.
- 3. Shallow Copy vs. Deep Copy: By default, the `clone()` method creates a shallow copy of the object. If the object contains references to other objects, the cloned object will have references to the same objects as the original object. In contrast, a deep copy creates copies of all the referenced objects, ensuring that the cloned object is completely independent of the original object.
Object cloning in Java refers to creating a copy of an object with the same state as the original object. Java provides a mechanism for object cloning through the `Cloneable` interface and the `clone()` method.
Here are the key points to understand about object cloning in Java:
Here's an example to demonstrate object cloning:
Example
private String name;
private int age;
public Person(String name, int age) {
this.name = name;
this.age = age;
}
// Override the clone() method to enable object cloning and provide a deep copy. @Override public Person clone() {
try {
return (Person) super.clone();
}
catch (CloneNotSupportedException e) {
// This exception should not occur, as we implement Cloneable. throw new AssertionError();
}
}
public String getName() {
return name;
}
public int getAge() {
return age;
}
}
public class ObjectCloningExample {
public static void main(String[] args) {
Person person1 = new Person("John", 30);
// Cloning the person object. Person person2 = person1.clone();
System.out.println(person1.getName() + ", " + person1.getAge());
// Output: John, 30 System.out.println(person2.getName() + ", " + person2.getAge());
// Output: John, 30 // Modifying the cloned object. person2.setName("Alice");
person2.setAge(25);
System.out.println(person1.getName() + ", " + person1.getAge());
// Output: John, 30 System.out.println(person2.getName() + ", " + person2.getAge());
// Output: Alice, 25 }
}
In this example, we implement the `Cloneable` interface in the `Person` class to enable cloning. The `clone()` method is overridden to create a shallow copy of the `Person` object. After cloning, we modify the properties of the cloned object, and it does not affect the original object, demonstrating the concept of a shallow copy. For a deep copy, you need to manually create copies of all referenced objects inside the `clone()` method.
Math class in java
1. `Math.abs(x)`:
Returns the absolute value of a number `x`.2. `Math.sqrt(x)`:
Returns the square root of a non-negative number `x`.3. `Math.pow(x, y)`:
Returns the value of `x` raised to the power of `y`.4. `Math.max(x, y)`:
Returns the greater of two values `x` and `y`.5. `Math.min(x, y)`:
Returns the smaller of two values `x` and `y`.6. `Math.ceil(x)`:
Returns the smallest integer that is greater than or equal to `x`.7. `Math.floor(x)`:
Returns the largest integer that is less than or equal to `x`.8. `Math.round(x)`:
Returns the closest long or int to the argument `x`.9. `Math.random()`:
Returns a random double value between 0.0 (inclusive) and 1.0 (exclusive).10. `Math.sin(x)`, `Math.cos(x)`, `Math.tan(x)`:
Trigonometric functions to calculate sine, cosine, and tangent of an angle `x` (in radians).11. `Math.log(x)`, `Math.log10(x)`:
Logarithmic functions to calculate the natural logarithm and base-10 logarithm of `x`, respectively.
The `Math` class in Java is part of the `java.lang` package and provides a set of static methods for performing various mathematical operations. It is not instantiable, meaning you cannot create objects of the `Math` class since all its methods are static. Instead, you directly call its methods using the class name.
Here are some commonly used methods provided by the `Math` class:
Here's an example demonstrating the use of some `Math` class methods:
Example
public static void main(String[] args) {
int num1 = 10;
int num2 = -5;
double num3 = 3.14;
// Absolute value System.out.println("Absolute value of " + num2 + ": " + Math.abs(num2));
// Square root System.out.println("Square root of " + num1 + ": " + Math.sqrt(num1));
// Power System.out.println(num2 + " raised to the power of " + num1 + ": " + Math.pow(num2, num1));
// Maximum and minimum System.out.println("Maximum of " + num1 + " and " + num2 + ": " + Math.max(num1, num2));
System.out.println("Minimum of " + num1 + " and " + num2 + ": " + Math.min(num1, num2));
// Rounding System.out.println("Rounded value of " + num3 + ": " + Math.round(num3));
// Random number double randomValue = Math.random();
System.out.println("Random number between 0 and 1: " + randomValue);
}
}
Keep in mind that the `Math` class provides various other mathematical functions that can be useful in different scenarios. Always refer to the Java documentation for a complete list of methods and their descriptions in the `Math` class.
Wrapper Class
- 1. `Byte`: Wraps a `byte` primitive type.
- 2. `Short`: Wraps a `short` primitive type.
- 3. `Integer`: Wraps an `int` primitive type.
- 4. `Long`: Wraps a `long` primitive type.
- 5. `Float`: Wraps a `float` primitive type.
- 6. `Double`: Wraps a `double` primitive type.
- 7. `Character`: Wraps a `char` primitive type.
- 8. `Boolean`: Wraps a `boolean` primitive type.
In Java, a wrapper class is a class that wraps (encapsulates) a primitive data type, allowing it to be treated as an object. This is necessary because many Java APIs and libraries require objects, not primitives, to be used in various operations. Wrapper classes provide a way to convert primitive data types into objects and vice versa.
Java provides the following eight wrapper classes for primitive data types:
Wrapper classes are often used when you need to perform operations that require objects, such as using collections (like `ArrayList` or `HashMap`) which can only store objects, not primitives. They are also used when working with Java generics, as generic types cannot accept primitive types directly.
Here's an example demonstrating the use of wrapper classes:
Example
public static void main(String[] args) {
// Using wrapper classes to convert primitive types to objects Integer num1 = Integer.valueOf(10);
Double num2 = Double.valueOf(3.14);
Character ch = Character.valueOf('A');
Boolean bool = Boolean.valueOf(true);
// Autoboxing: Automatic conversion of primitive types to wrapper objects Integer num3 = 20;
Double num4 = 2.71;
Character ch2 = 'B';
Boolean bool2 = false;
// Unboxing: Automatic conversion of wrapper objects to primitive types int num5 = num1.intValue();
double num6 = num2.doubleValue();
char ch3 = ch.charValue();
boolean bool3 = bool.booleanValue();
System.out.println("Using Wrapper Classes:");
System.out.println("num1: " + num1);
System.out.println("num2: " + num2);
System.out.println("ch: " + ch);
System.out.println("bool: " + bool);
System.out.println("\nAutoboxing:");
System.out.println("num3: " + num3);
System.out.println("num4: " + num4);
System.out.println("ch2: " + ch2);
System.out.println("bool2: " + bool2);
System.out.println("\nUnboxing:");
System.out.println("num5: " + num5);
System.out.println("num6: " + num6);
System.out.println("ch3: " + ch3);
System.out.println("bool3: " + bool3);
}
}
In this example, we use the wrapper classes to convert primitive types (int, double, char, boolean) into their corresponding wrapper objects. We also demonstrate autoboxing, which is the automatic conversion of primitive types to wrapper objects, and unboxing, which is the automatic conversion of wrapper objects to primitive types.
Java Recursion
Recursion is a programming technique in which a method calls itself to solve a problem. It is a powerful concept used in various algorithms and data structures. In Java, a method can call itself directly or indirectly through other methods. Recursive solutions are elegant, but they should be used with care, as improper usage can lead to stack overflow errors.
To understand recursion, let's look at an example of calculating the factorial of a number using recursion:
Example
public static int factorial(int n) {
if (n == 0 || n == 1) {
return 1;
}
else {
return n * factorial(n - 1);
}
}
public static void main(String[] args) {
int num = 5;
int result = factorial(num);
System.out.println("Factorial of " + num + " is: " + result);
}
}
In this example, the `factorial` method calculates the factorial of a number `n`. If `n` is 0 or 1, the method returns 1 (base case). Otherwise, it calculates the factorial by calling itself with `n - 1` (recursive case). The method continues to call itself with smaller values of `n` until it reaches the base case and then returns the final result.
Another common example is computing the Fibonacci series using recursion:
Example
public static int fibonacci(int n) {
if (n <= 1) {
return n;
}
else {
return fibonacci(n - 1) + fibonacci(n - 2);
}
}
public static void main(String[] args) {
int num = 7;
System.out.println("Fibonacci series up to " + num + ":");
for (int i = 0;
i <= num;
i++) {
System.out.print(fibonacci(i) + " ");
}
}
}
In this example, the `fibonacci` method calculates the nth number in the Fibonacci series. If `n` is less than or equal to 1, it returns `n` (base case). Otherwise, it calculates the Fibonacci number by recursively calling itself with `n - 1` and `n - 2` and adding the results.
Recursion is a powerful tool, but it should be used judiciously. To ensure that recursive calls do not lead to stack overflow, it's essential to have a base case that terminates the recursion and to ensure that the problem size reduces with each recursive call.
Call By Value
In programming languages, there are two ways to pass arguments to methods or functions: call by value and call by reference.
Call by value is a method of passing arguments to a method or function by copying the value of the actual parameter into the formal parameter of the method. This means that the method receives a copy of the original value, and any changes made to the formal parameter within the method do not affect the original value of the actual parameter.
Let's illustrate call by value with an example in Java:
Example
public static void changeValue(int num) {
num = num + 10;
// The change is made to the formal parameter num }
public static void main(String[] args) {
int x = 5;
System.out.println("Before method call, x = " + x);
changeValue(x);
System.out.println("After method call, x = " + x);
}
}
In the above example, we have a method `changeValue` that takes an integer parameter `num`. When we call this method with `x` as an argument, the value of `x` (which is 5) is copied to the formal parameter `num` inside the method. Any changes made to `num` inside the method do not affect the original value of `x` outside the method. Hence, even though we modified `num` to `num + 10`, the value of `x` remains unchanged.
In call by value, the method operates on a copy of the original value, which makes it safe and simple to use. However, keep in mind that any changes made to the formal parameter inside the method do not affect the original value of the actual parameter.
Command Line Arg
Command line arguments are values that are passed to a program when it is executed from the command line or terminal. These arguments provide a way to input data or options into a program without modifying its source code. In Java, command line arguments can be accessed through the `main` method's parameter, which is an array of strings.
The syntax to run a Java program with command line arguments is as follows:
Example
Where `ClassName` is the name of the Java class that contains the `main` method, and `arg1`, `arg2`, `arg3`, etc., are the command line arguments.
Here's an example of a simple Java program that takes two command line arguments and prints them:
Example
public static void main(String[] args) {
if (args.length == 2) {
String arg1 = args[0];
String arg2 = args[1];
System.out.println("First argument: " + arg1);
System.out.println("Second argument: " + arg2);
}
else {
System.out.println("Please provide two command line arguments.");
}
}
}
To run this program with command line arguments, you would use the following command:
Example
In this example, the program checks if exactly two command line arguments are provided. If two arguments are provided, it accesses them using the `args` array and prints them. Otherwise, it displays a message asking the user to provide two command line arguments.
Using command line arguments allows users to customize the behavior of the program without recompiling the code, making the program more flexible and versatile.
Overloading vs Overriding
- 1. Method Overloading:
- Method overloading allows a class to have multiple methods with the same name but different parameters.
- The methods must have different parameter types, different number of parameters, or both.
- The return type of the method does not play a role in overloading.
- Method overloading helps in providing a different way to perform the same operation based on the type or number of inputs.
- Overloaded methods are resolved during compile-time based on the method signature (name and parameters).
- 2. Method Overriding:
- Method overriding occurs when a subclass provides a specific implementation of a method that is already defined in its superclass.
- The method signature (name, parameters, and return type) in the subclass must be exactly the same as the method in the superclass.
- Method overriding allows a subclass to provide its own implementation for a specific behavior inherited from the superclass.
- The behavior of the method is resolved at runtime based on the actual type of the object.
Overloading and overriding are two important concepts in object-oriented programming, especially in Java. They both involve methods, but they serve different purposes.
Example of method overloading:
public int add(int a, int b) {
return a + b;
}
public double add(double a, double b) {
return a + b;
}
public int add(int a, int b, int c) {
return a + b + c;
}
}
Example of method overriding:
void draw() {
System.out.println("Drawing a shape");
}
}
class Circle extends Shape {
@Override void draw() {
System.out.println("Drawing a circle");
}
}
class Triangle extends Shape {
@Override void draw() {
System.out.println("Drawing a triangle");
}
}
In this example, the `Shape` class has a method `draw()`. The `Circle` and `Triangle` classes are subclasses of `Shape` and they override the `draw()` method to provide their own implementation.
In summary, method overloading is about providing multiple methods with the same name but different parameters within the same class, while method overriding is about providing a specific implementation for a method in a subclass that is already defined in the superclass.
Java String
1. Creating a String:
You can create a `String` object in Java using either a string literal or by using the `new` keyword with the `String` constructor.2. String Length:
You can find the length of a `String` using the `length()` method.3. Concatenation:
You can concatenate two `String` objects using the `+` operator or the `concat()` method.4. Substring:
You can extract a substring from a `String` using the `substring()` method.5. Searching and Replacing:
The `indexOf()` method is used to find the index of a substring within a `String`.6. Splitting:
The `split()` method is used to split a `String` into an array of substrings based on a specified delimiter.7. Formatting:
Java provides the `String.format()` method to format strings.8. Comparison:
You can compare `String` objects using the `equals()` method for content comparison and `compareTo()` method for lexicographic comparison.
In Java, the `String` class is used to represent a sequence of characters. It is one of the most commonly used classes in Java and is part of the `java.lang` package, so you don't need to import it explicitly. The `String` class is immutable, which means that once a `String` object is created, its value cannot be changed. Any operation that appears to modify a `String` actually creates a new `String` object with the modified value.
Here are some key features and functionalities of the `String` class:
Example
// String literal String str2 = new String("World");
// Using constructor
Example
int length = str.length();
// length is 4
Example
String lastName = "Doe";
String fullName1 = firstName + " " + lastName;
// John Doe String fullName2 = firstName.concat(" ").concat(lastName);
// John Doe
Example
String substr = str.substring(0, 5);
// substr is "Hello"
Example
int index = str.indexOf("Pro");
// index is 5
The `replace()` method is used to replace characters in a `String`.
Example
String newStr = str.replace("o", "x");
// newStr is "Hellx, Wxrld"
Example
String[] fruits = str.split(",");
// fruits is {
"apple", "banana", "orange"}
Example
String formattedStr = String.format("The number is %d", num);
// "The number is 42"
Example
String str2 = "World";
boolean isEqual = str1.equals(str2);
// false int compareResult = str1.compareTo(str2);
// negative value, since "H" comes before "W" in lexicographic order
Remember that since `String` objects are immutable, any operation that seems to modify a `String` actually creates a new `String` object with the updated value. So, be cautious when performing frequent modifications on long strings to avoid unnecessary memory overhead.
Java Regex
1. `Pattern` class:
The `Pattern` class represents a compiled regex pattern. It is typically used to create a regex pattern using the `compile()` method.2. `Matcher` class:
The `Matcher` class is used to match a pattern against an input string. It is obtained by invoking the `matcher()` method on the `Pattern` object.3. `matches()` method:
The `matches()` method of the `Matcher` class checks if the entire input sequence matches the regex pattern.4. `find()` method:
The `find()` method of the `Matcher` class attempts to find the next subsequence that matches the pattern.5. `group()` method:
The `group()` method of the `Matcher` class returns the matched subsequence.6. `replaceAll()` method:
The `replaceAll()` method of the `Matcher` class replaces all occurrences of the regex pattern with a specified replacement string.7. Common Regex Metacharacters:
- `.`: Matches any single character.
- `^`: Matches the start of a line.
- `$`: Matches the end of a line.
- `*`: Matches zero or more occurrences of the preceding character.
- `+`: Matches one or more occurrences of the preceding character.
- `?`: Matches zero or one occurrence of the preceding character.
- `[ ]`: Matches any single character within the brackets.
- `[^ ]`: Matches any single character not in the brackets.
- `|`: Acts like a logical OR, matches either the expression before or after it.
- `()` : Groups a subexpression.
Here's a simple example of using regular expressions in Java:
Example
import java.util.regex.*;
public class RegexExample {
public static void main(String[] args) {
String input = "The quick brown fox jumps 123 over the lazy dog";
// Create a regex pattern to match words Pattern pattern = Pattern.compile("\\b\\w+\\b");
Matcher matcher = pattern.matcher(input);
// Find and print all words in the input while (matcher.find()) {
System.out.println(matcher.group());
}
}
}
In Java, regular expressions (regex) are used to match and manipulate text patterns. The `java.util.regex` package provides classes for working with regular expressions. Regular expressions are powerful tools for pattern matching and can be used for tasks such as validation, searching, and replacing text.
Here are some key classes and methods related to regular expressions in Java:
Example
// Creating a regex pattern to match digits Pattern pattern = Pattern.compile("\\d+");
Example
// Creating a Matcher object to match the pattern against a string Matcher matcher = pattern.matcher("12345");
Example
// true, since the input string contains only digits
Example
// true, since the input string contains digits
Example
// "12345", the matched digits
Example
// "XXXXX", replaces all digits with "X"
Output:
quick
brown
fox
jumps
over
the
lazy
dog
In this example, the regex pattern `\\b\\w+\\b` matches any word in the input string. The `\\b` denotes word boundaries, and `\\w+` matches one or more word characters. The `find()` method of the `Matcher` object is used to find each word, and the `group()` method is used to retrieve the matched word.
Exception Handling
- 1. `try`, `catch`, and `finally` blocks:
- The `try` block contains the code that might throw an exception.
- The `catch` block catches the exception and handles it. It is executed when an exception occurs in the `try` block.
- The `finally` block contains code that is executed regardless of whether an exception occurred or not. It is optional.
- 2. `throw` keyword:
- The `throw` keyword is used to explicitly throw an exception.
- It is typically used in custom exception handling to indicate that a particular error condition has occurred.
- 3. `throws` keyword:
- The `throws` keyword is used in the method signature to specify that a method may throw a particular type of exception.
- It is used when the method wants to delegate the responsibility of handling the exception to the calling method.
- 4. Exception hierarchy:
- Java has a hierarchy of exception classes. All exceptions are subclasses of the `Throwable` class.
- There are two main types of exceptions: checked exceptions (subclass of `Exception`) and unchecked exceptions (subclass of `RuntimeException`).
Exception handling in Java allows you to deal with unexpected situations or errors that may occur during the program's execution. It helps prevent the program from terminating abruptly and provides a way to handle errors gracefully. In Java, exceptions are represented as objects and are part of the Java runtime environment.
The key components of exception handling in Java are:
Here's a basic example of exception handling in Java:
Example
public static void main(String[] args) {
try {
int result = divide(10, 0);
System.out.println("Result: " + result);
}
catch (ArithmeticException e) {
System.out.println("Exception caught: " + e.getMessage());
}
finally {
System.out.println("Finally block executed.");
}
}
public static int divide(int num1, int num2) {
if (num2 == 0) {
throw new ArithmeticException("Division by zero not allowed.");
}
return num1 / num2;
}
}
In this example, the `divide` method takes two integers as parameters and throws an `ArithmeticException` if the second number is zero. The `main` method calls the `divide` method within a `try` block. Since division by zero is attempted, an `ArithmeticException` is thrown. The `catch` block catches the exception and handles it, printing an error message. The `finally` block is always executed, regardless of whether an exception occurred or not.
Exception handling is essential for writing robust and reliable Java programs. It allows you to gracefully handle errors, recover from unexpected situations, and provide meaningful feedback to users.
Java Inner classes
1.Member Inner Class:
- A member inner class is declared as a member of the outer class and can access all the members of the outer class, including private members.
- It is created inside the body of the outer class.
2. Static Nested Class:
- A static nested class is a static class that is declared as a static member of the outer class.
- It does not have access to the instance members of the outer class, only to the static members.
3. Local Inner Class:
- A local inner class is defined inside a block (typically within a method) and has a limited scope within that block.
- It can access final variables and effectively final variables from the enclosing block.
4. Anonymous Inner Class:
- An anonymous inner class is declared and instantiated at the same time without giving it a name.
- It is typically used for implementing interfaces or extending classes on-the-fly.
In Java, an inner class is a class that is defined inside another class. Inner classes have access to the members (fields and methods) of the outer class and can be used to logically group related functionalities. There are four types of inner classes in Java:
Example
private int outerVariable = 10;
public void outerMethod() {
System.out.println("Outer method");
}
public class InnerClass {
private int innerVariable = 20;
public void innerMethod() {
System.out.println("Inner method");
System.out.println("Accessing outerVariable: " + outerVariable);
outerMethod();
}
}
}
Example
private static int staticVariable = 30;
public static void staticMethod() {
System.out.println("Static method");
}
public static class StaticNestedClass {
private int nestedVariable = 40;
public void nestedMethod() {
System.out.println("Nested method");
System.out.println("Accessing staticVariable: " + staticVariable);
staticMethod();
}
}
}
Example
public void outerMethod() {
final int localVariable = 50;
class LocalInnerClass {
public void innerMethod() {
System.out.println("Inner method");
System.out.println("Accessing localVariable: " + localVariable);
}
}
LocalInnerClass inner = new LocalInnerClass();
inner.innerMethod();
}
}
Example
public void displayMessage() {
Thread thread = new Thread(new Runnable() {
@Override public void run() {
System.out.println("Thread is running");
}
}
);
thread.start();
}
}
Inner classes provide a way to logically group classes that are only used in one place, improve encapsulation, and keep the code more organized. However, they should be used judiciously, as excessive use of inner classes can make the code complex and harder to maintain.
Java Multithreading
Java multithreading allows concurrent execution of multiple threads within a Java program. Threads are lightweight subprocesses, and using them can help improve the performance and responsiveness of a program by utilizing multiple CPU cores and allowing tasks to run in parallel. In Java, multithreading is achieved using the `Thread` class and the `Runnable` interface.
Here's a simple example of creating and running a thread using the `Thread` class:
Example
public void run() {
for (int i = 1;
i <= 5;
i++) {
System.out.println("Thread " + Thread.currentThread().getId() + ": Count " + i);
}
}
}
public class Main {
public static void main(String[] args) {
MyThread thread1 = new MyThread();
MyThread thread2 = new MyThread();
thread1.start();
// Start the first thread thread2.start();
// Start the second thread }
}
In this example, we create a `MyThread` class that extends the `Thread` class and overrides its `run()` method. The `run()` method contains the code that will be executed when the thread is started.
To start a thread, we create an instance of the `MyThread` class and call its `start()` method. This will invoke the `run()` method in a separate thread.
Another way to implement multithreading in Java is by implementing the `Runnable` interface:
Example
public void run() {
for (int i = 1;
i <= 5;
i++) {
System.out.println("Thread " + Thread.currentThread().getId() + ": Count " + i);
}
}
}
public class Main {
public static void main(String[] args) {
MyRunnable myRunnable = new MyRunnable();
Thread thread1 = new Thread(myRunnable);
Thread thread2 = new Thread(myRunnable);
thread1.start();
// Start the first thread thread2.start();
// Start the second thread }
}
In this case, we create a `MyRunnable` class that implements the `Runnable` interface and overrides its `run()` method. Then, we create instances of the `Thread` class and pass the `MyRunnable` object to the constructor. Finally, we start both threads using the `start()` method.
Using multithreading, you can perform tasks concurrently, which can lead to significant performance improvements in certain situations. However, you need to be cautious about thread synchronization and potential race conditions when multiple threads access shared resources. Java provides various synchronization mechanisms like `synchronized` keyword, `Lock` interface, and `Atomic` classes to handle thread safety effectively.
Java I/O
1. Character-based I/O:
It deals with reading and writing text data, character by character or line by line.2. Byte-based I/O:
It deals with reading and writing binary data, byte by byte or in chunks.1. `File`:
Represents a file or directory in the file system.2. `FileInputStream` and `FileOutputStream`:
Used to read from and write to files, respectively, in byte format.3. `FileReader` and `FileWriter`:
Used to read from and write to files, respectively, in character format.4. `BufferedReader` and `BufferedWriter`:
Used to read and write data in a buffered manner for better performance.5. `InputStreamReader` and `OutputStreamWriter`:
Used to bridge byte streams to character streams.6. `Scanner`:
Used to read user input from the console.1. Reading from a File using `FileReader` and `BufferedReader`:
2. Writing to a File using `FileWriter` and `BufferedWriter`:
3. Reading user input from the console using `Scanner`:
Java I/O (Input/Output) is a mechanism in Java that allows a program to interact with external data, such as files, the console, and network connections. Java provides a rich set of classes and methods in the `java.io` package to handle various I/O operations.
There are two types of I/O in Java:
Some of the important classes in Java I/O are:
Here are some examples of Java I/O operations:
Example
public class ReadFileExample {
public static void main(String[] args) {
try (BufferedReader reader = new BufferedReader(new FileReader("example.txt"))) {
String line;
while ((line = reader.readLine()) != null) {
System.out.println(line);
}
}
catch (IOException e) {
e.printStackTrace();
}
}
}
Example
public class WriteFileExample {
public static void main(String[] args) {
try (BufferedWriter writer = new BufferedWriter(new FileWriter("output.txt"))) {
writer.write("Hello, this is a sample text.");
}
catch (IOException e) {
e.printStackTrace();
}
}
}
Example
public class ConsoleInputExample {
public static void main(String[] args) {
Scanner scanner = new Scanner(System.in);
System.out.print("Enter your name: ");
String name = scanner.nextLine();
System.out.println("Hello, " + name + "!");
}
}
These are just a few examples of Java I/O operations. The `java.io` package provides a wide range of classes and methods to handle different I/O scenarios efficiently.
Java Applet
Java Applet is a small program that is embedded within a web page and executed by a web browser. It was a popular way to add interactive content, such as animations, games, and multimedia, to web pages in the past. However, with the advancements in web technologies and security concerns, Java Applets are now considered outdated and deprecated.
1. Applet Lifecycle:
Java Applets have a lifecycle consisting of several methods like `init()`, `start()`, `stop()`, and `destroy()`. These methods are called by the applet container during various stages of an applet's life.2. Graphics:
The `Graphics` class provides methods for drawing shapes, text, and images on the applet's window.3. Event Handling:
Applets can handle various user events, such as mouse clicks and key presses, using event listeners.4. GUI Components:
Applets can contain various GUI components, such as buttons, labels, and text fields.5. Networking:
Applets can perform network operations, such as making HTTP requests, using `java.net` classes.
Basic Example
import java.awt.Graphics;
public class MyApplet extends Applet {
public void paint(Graphics g) {
g.drawString("Hello, Applet!", 50, 50);
}
}
In this example, we create a simple Java Applet that displays the text "Hello, Applet!" on the applet's window using the `paint()` method from the `Graphics` class.
To run the applet, you need to compile the Java code and create an HTML file to embed the applet. Here's an example of the HTML file:
Basic Example
In the HTML file, we use the `
Note: As mentioned earlier, Java Applets are no longer widely used due to security risks and the availability of more modern web technologies like HTML5, JavaScript, and CSS. Most web browsers have disabled support for Java Applets, and they are no longer recommended for use on the web. If you are looking to develop interactive web applications, consider using HTML5 and JavaScript-based solutions instead.
important concepts in Java Applets
Basic Example
import java.awt.Graphics;
public class MyApplet extends Applet {
public void init() {
// Initialization code
}
public void start() {
// Start code
}
public void paint(Graphics g) {
// Drawing code
g.drawString("Hello, Applet!", 50, 50);
}
public void stop() {
// Stop code
}
public void destroy() {
// Cleanup code
}
}
Basic Example
import java.awt.Graphics;
public class DrawingApplet extends Applet {
public void paint(Graphics g) {
g.drawRect(50, 50, 200, 100); // Draw a rectangle
g.drawOval(100, 150, 100, 100); // Draw an oval
g.drawString("Hello, Applet!", 50, 250); // Draw text
}
}
Basic Example
import java.awt.event.MouseEvent;
import java.awt.event.MouseListener;
public class MouseClickApplet extends Applet implements MouseListener {
public void init() {
addMouseListener(this); // Register the applet as a mouse listener
}
public void mouseClicked(MouseEvent e) {
int x = e.getX();
int y = e.getY();
showStatus("Mouse clicked at (" + x + ", " + y + ")");
}
public void mouseEntered(MouseEvent e) {}
public void mouseExited(MouseEvent e) {}
public void mousePressed(MouseEvent e) {}
public void mouseReleased(MouseEvent e) {}
}
Basic Example
import java.awt.Button;
import java.awt.event.ActionEvent;
import java.awt.event.ActionListener;
public class ButtonApplet extends Applet implements ActionListener {
private Button clickButton;
public void init() {
clickButton = new Button("Click Me");
clickButton.addActionListener(this);
add(clickButton);
}
public void actionPerformed(ActionEvent e) {
showStatus("Button Clicked!");
}
}
Basic Example
import java.io.BufferedReader;
import java.io.InputStreamReader;
import java.net.URL;
public class NetworkApplet extends Applet {
public void init() {
try {
URL url = new URL("https://www.example.com");
BufferedReader reader = new BufferedReader(new InputStreamReader(url.openStream()));
String line;
while ((line = reader.readLine()) != null) {
System.out.println(line);
}
reader.close();
} catch (Exception e) {
e.printStackTrace();
}
}
}
Please note that Java Applets are now considered outdated and not widely used due to security and compatibility issues with modern web browsers. It's recommended to use other technologies, like HTML5, CSS, and JavaScript, for web development instead.